When Google search stops loading or google.com refuses to open in Chrome, the cause is usually a hijacked search engine, a stale cookie, a misbehaving extension, or an outdated Chrome build. You can fix most cases with a quick settings check, a cache clear, or a settings reset.
Work through the fixes in the order shown, from the fastest checks to a full Chrome reinstall. Every menu path matches the current Chrome desktop interface.
In this guide, I have covered:
Contents
Why Google Is Not Working in Chrome
Google search won’t load, the homepage sits blank, or Gmail and Drive keep spinning in Chrome. Before you assume Google is down, know this: the cause is almost always local to the browser or your computer, not Google’s servers.
The most common triggers are:
- Chrome’s default search engine got switched to Bing, Yahoo, or a fake Google clone.
- Stale cookies or cached data left over from a recent Google sign-in change.
- An extension, often an ad blocker, a VPN proxy, or a search hijacker, is blocking Google’s scripts.
- An outdated Chrome build that Google no longer fully supports.
- Wrong system date and time, which breaks Google’s SSL certificate check.
- A corrupt DNS cache inside Chrome.
Work through the fixes in the order shown. Stop at the first one that solves the problem.
Check if Google Is Actually Down
Before you change a single setting in Chrome, open Safari, Firefox, Edge, or your phone on cellular data and try https://www.google.com.
If Google loads in another browser or on another device, the problem is inside Chrome and the rest of this guide applies. If Google fails everywhere, the issue is on Google’s end or within your network, and no Chrome setting will resolve it. Downdetector is a quick way to see whether other people are reporting the same outage.
Update Google Chrome
Outdated Chrome builds create a surprising number of “Google won’t load” reports. Google eventually drops support for older versions, and the fix is usually one click from the main menu.
- Launch the Google Chrome on your computer.
- Click on More
 for the options list, and select the Settings menu.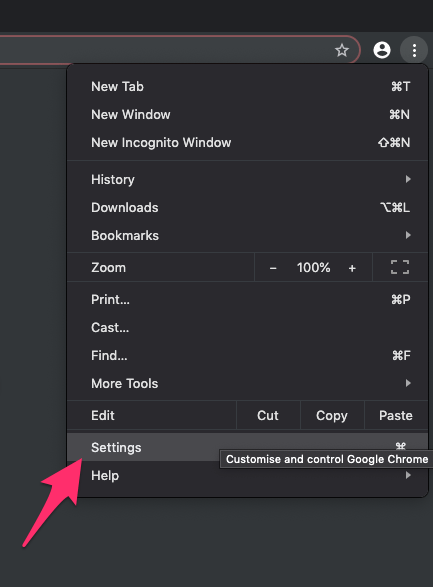
- Switch to the About Chrome tab in the left sidebar pane.
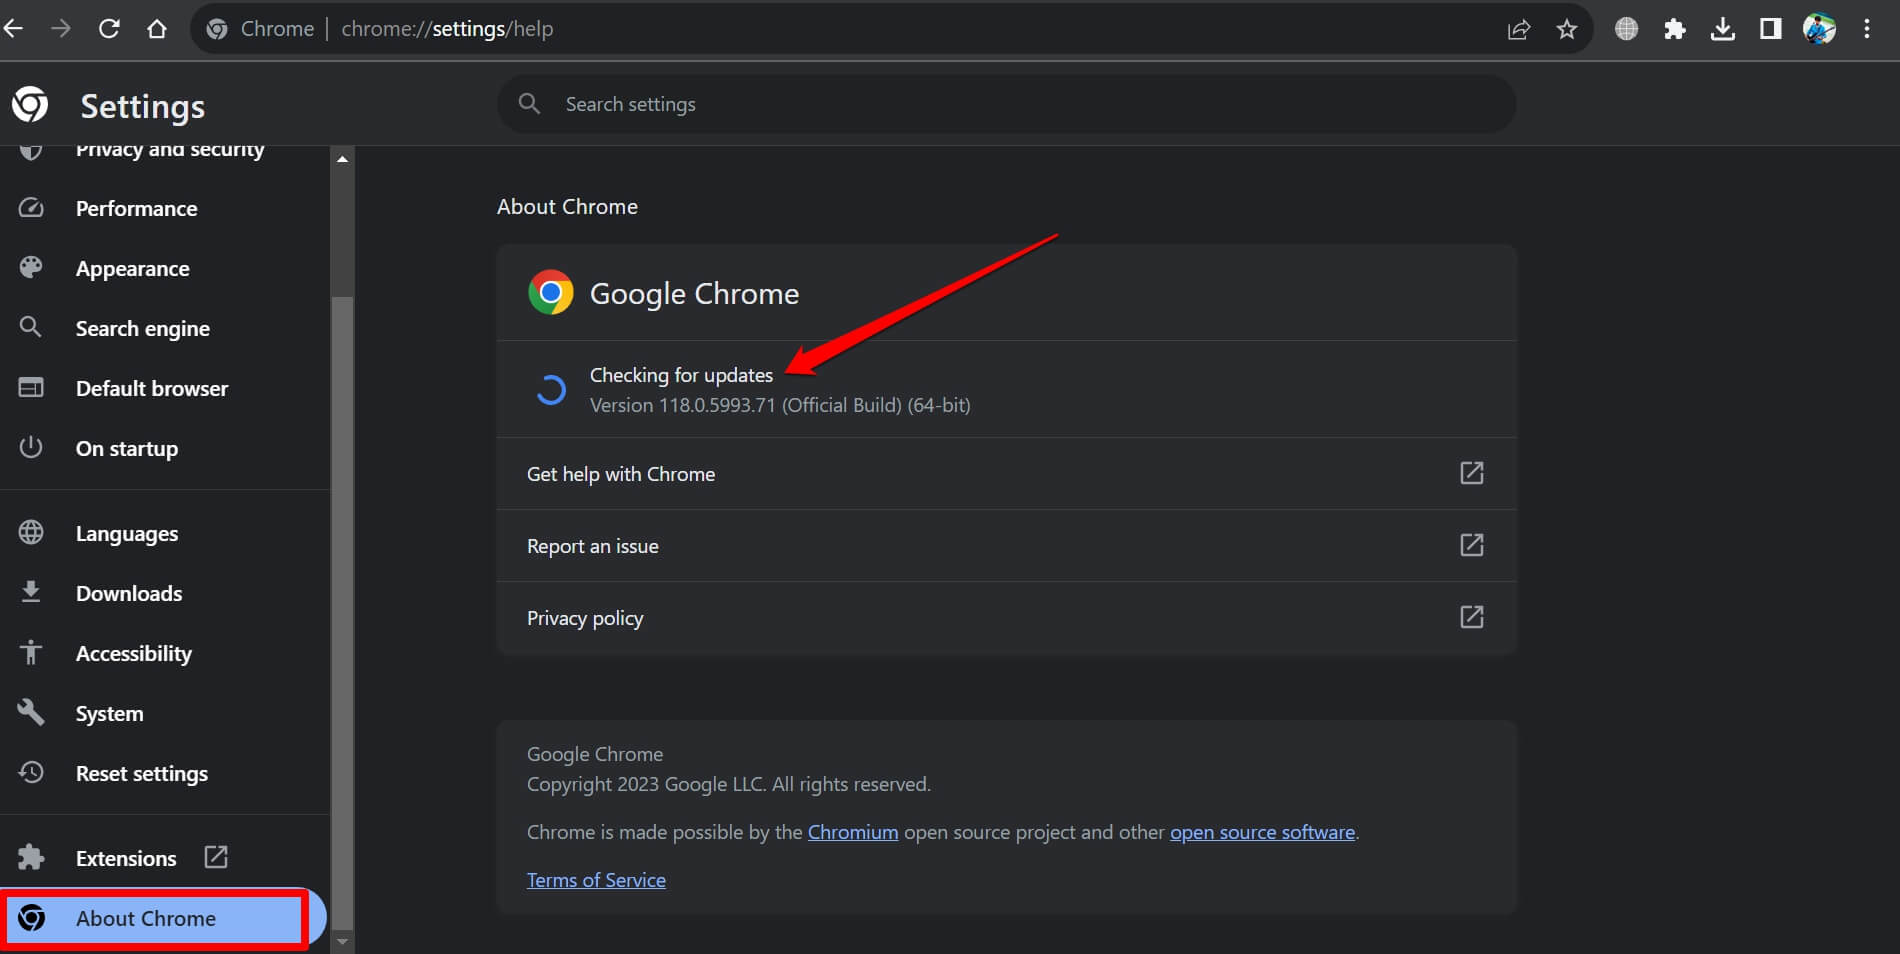 The browser should automatically start looking for the latest updates.
 - Hit on the button.
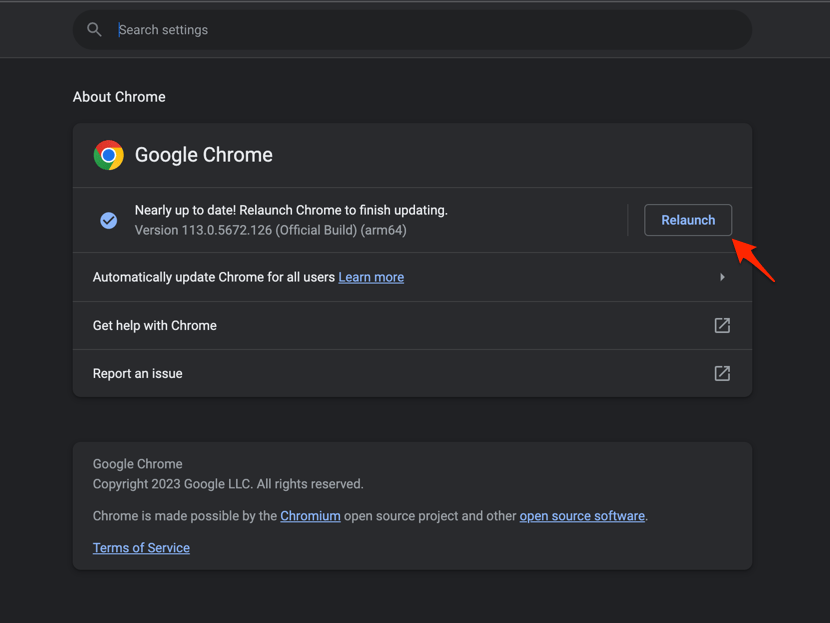 It will complete the Chrome browser update process.
After Chrome relaunches, try Google again. If you see “Chrome is up to date” and no Relaunch button, you were already current.
Set Google as Your Default Search Engine
If typing into the address bar sends you to Bing, Yahoo, or a search site you don’t recognize, your default search engine changed. Chrome can put Google back in seconds.
Click the three-dot menu at the top right of Chrome, choose Settings, then click Search engine in the left sidebar. Under “Search engine used in the address bar,” click Change and pick Google. Click Set as default to confirm.
Open Manage search engines and site search on the same page and scan the list. If you spot a suspicious “Google” entry that points to a different URL, often with extra words like “search” or “fast” in the address, click the three-dot menu next to it and choose Delete. Then use the ⋮ menu next to the real Google entry and pick Make default.
You’ll know it worked when a search typed into the address bar returns results from google.com.
Clear Chrome’s Cookies and Cache
Stale cookies can trap Chrome in a broken Google sign-in session. A corrupted cache can keep a bad copy of the Google homepage loaded. Clearing both usually clears the page that spins or refuses to load.
- Open the Google Chrome on your computer.
- Click on the More for menu options, and hover on the More Tools menu.
- Select the Clear Browsing Data... sub-menu from the list.
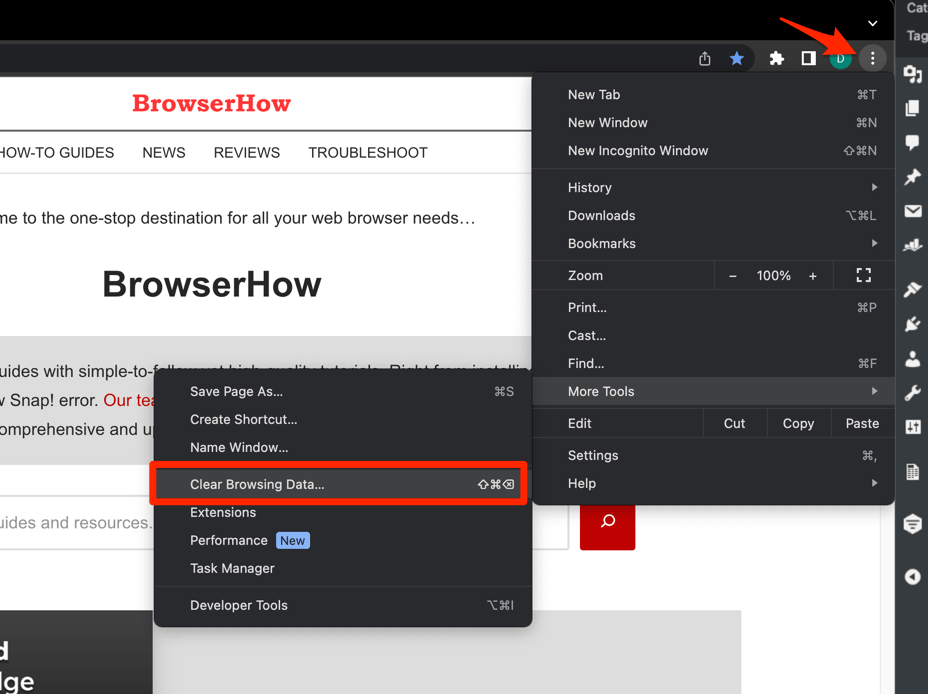 It will open the Clear browsing data settings window.
 - Choose the Time Range from the drop-down and select the checkboxes for the 'Cookies and other site data' and 'Cached images and files' options.
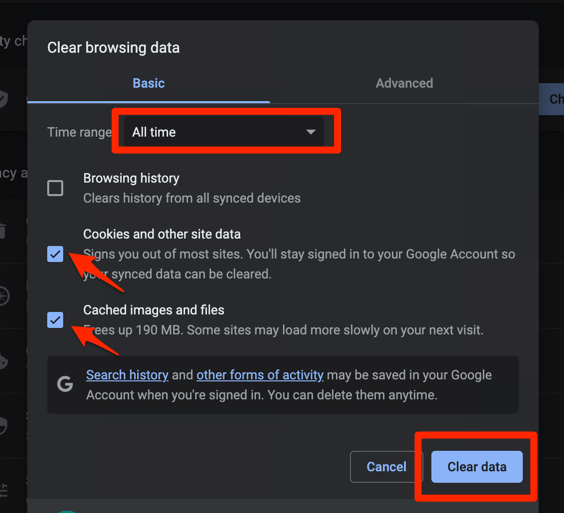
- Finally, hit the command button.
It will delete the stored cookies and cache data from your Chrome browser.
After Chrome restarts, open google.com again. You will need to sign back into your Google services, but the search page should now load normally.
Try Google in an Incognito Window
Incognito mode launches Chrome without your extensions, cookies, and cached files. It is the fastest way to see whether something saved in your profile is breaking Google.
- Launch the Google Chrome on your computer.
- Click on the More menu for the list.
- Select the New Incognito Window option.
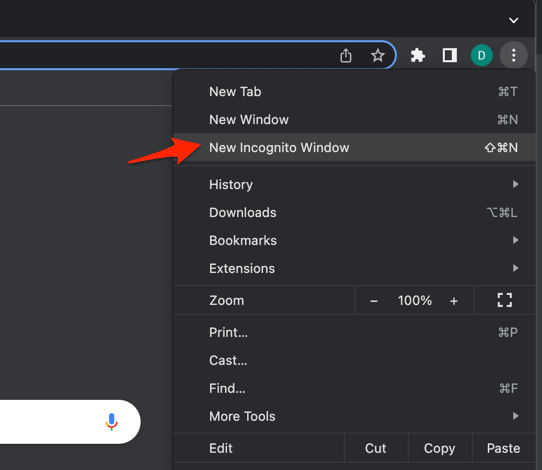 It will start a new incognito window in the browser.
If Google loads in Incognito but not in your normal window, the culprit is an extension, a cookie, or a profile setting. Jump to the extension fix below.
Disable Chrome Extensions
Ad blockers, VPN or proxy extensions, privacy tools, and shopping coupon extensions are the usual suspects. Any one of them can rewrite a URL or block a script that Google needs.
- Launch the Google Chrome on your computer.
- Click on the More for the list menu.
- Hover on the More Tools menu and choose the Extensions sub-menu.
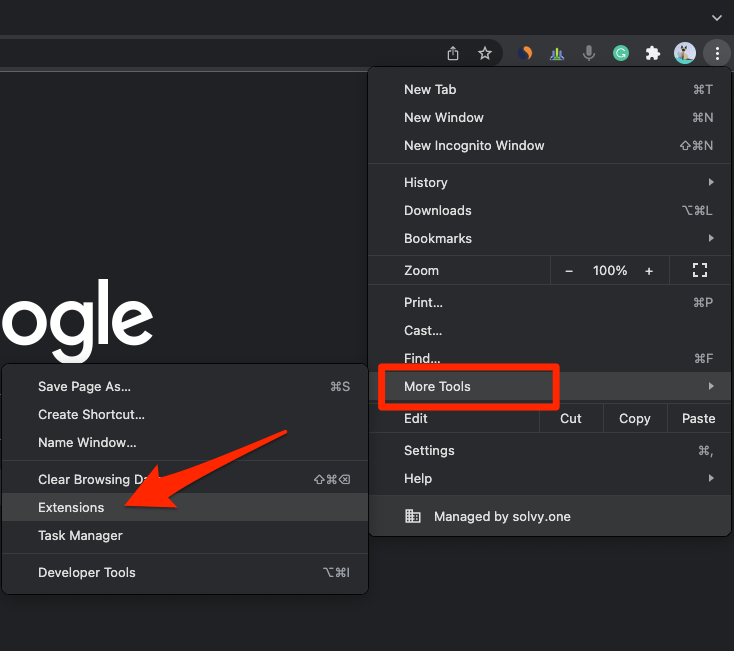 It will open the Chrome Extensions Manager page with the list of installed extensions.
 - Toggle the switch to Disable the extension.
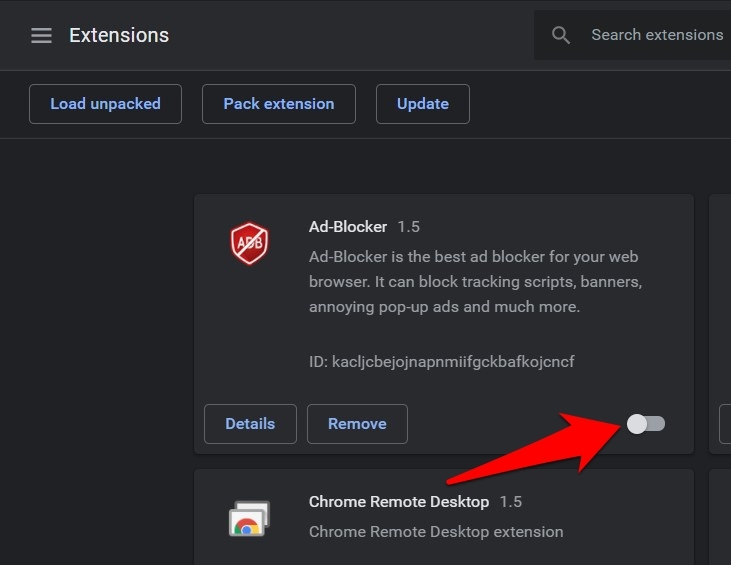
With all extensions off, reload Google. If it loads, re-enable your extensions one at a time and reload Google after each toggle. The extension that breaks the page is the offender. Uninstall it or replace it.
Clear Chrome’s Internal DNS Cache
Chrome keeps a separate DNS cache from your operating system. If that cache is stale or poisoned, Chrome cannot resolve google.com even when every other program on your computer can.
- Launch Google Chrome on your Computer.
- Type in chrome://net-internals/#dns in the address bar, and hit key.
It will open the Chrome DNS network page. - Hit the command button.
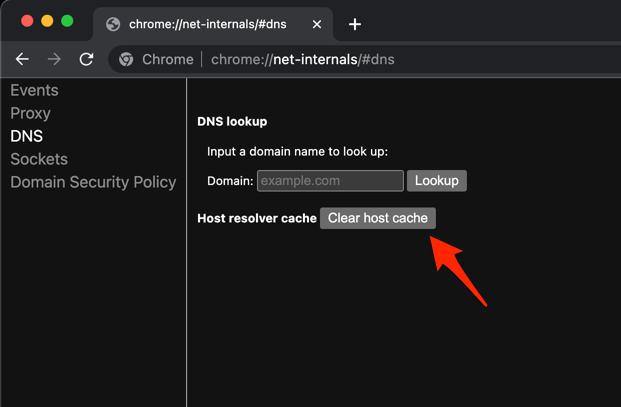
- Relaunch the Chrome browser.
It will clear the Chrome DNS host cache.
Chrome clears the cache automatically on the next restart. Once Chrome reloads, try Google again.
Check Your Computer’s Date and Time
Google uses HTTPS with strict certificate validation. If your computer’s clock is off by a few minutes or hours, Chrome refuses the connection because Google’s certificate looks expired or not yet valid. This usually shows up as NET::ERR_CERT_DATE_INVALID on google.com.
- Press the button to open the Start menu, and select the Settings
 menu.
menu.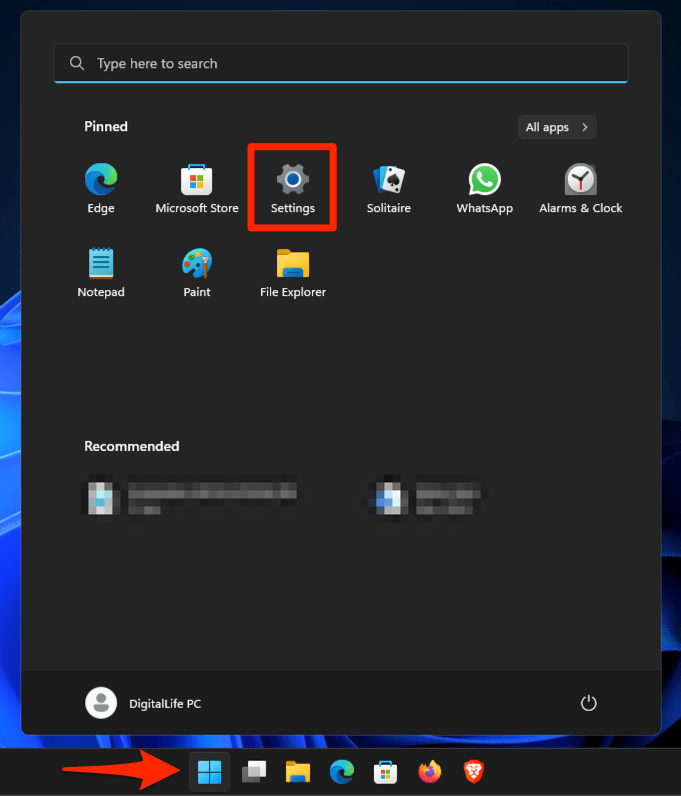 It will open the Windows Settings window.
 - Switch to the Time & Language tab in the left pane.
- Ensure the Time zone reflects correctly, and if it is incorrect, then use the drop-down in the Time zone menu to correct it.
- Enable the toggle switch for the Set time automatically option.
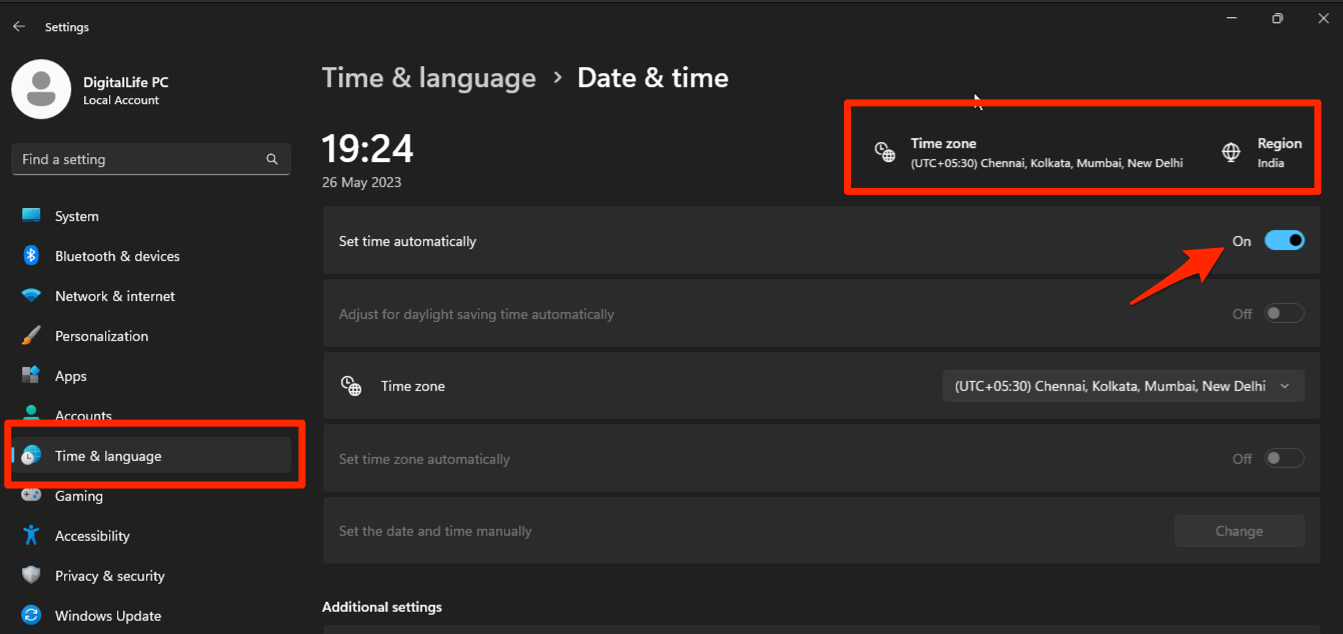
- If you want to adjust time manually, disable the Set time automatically toggle switch and use the command on the Set the date and time manually option.
On macOS, open System Settings, go to General → Date & Time, and turn on Set time and date automatically. Once your clock is correct, reload Google.
Switch to a Public DNS Server
If Google will not load on any browser or device, your ISP’s DNS servers may be slow, out of date, or actively blocking Google. Switching to a public DNS server often fixes it.
- Search and open the Control Panel using the Windows Start menu.
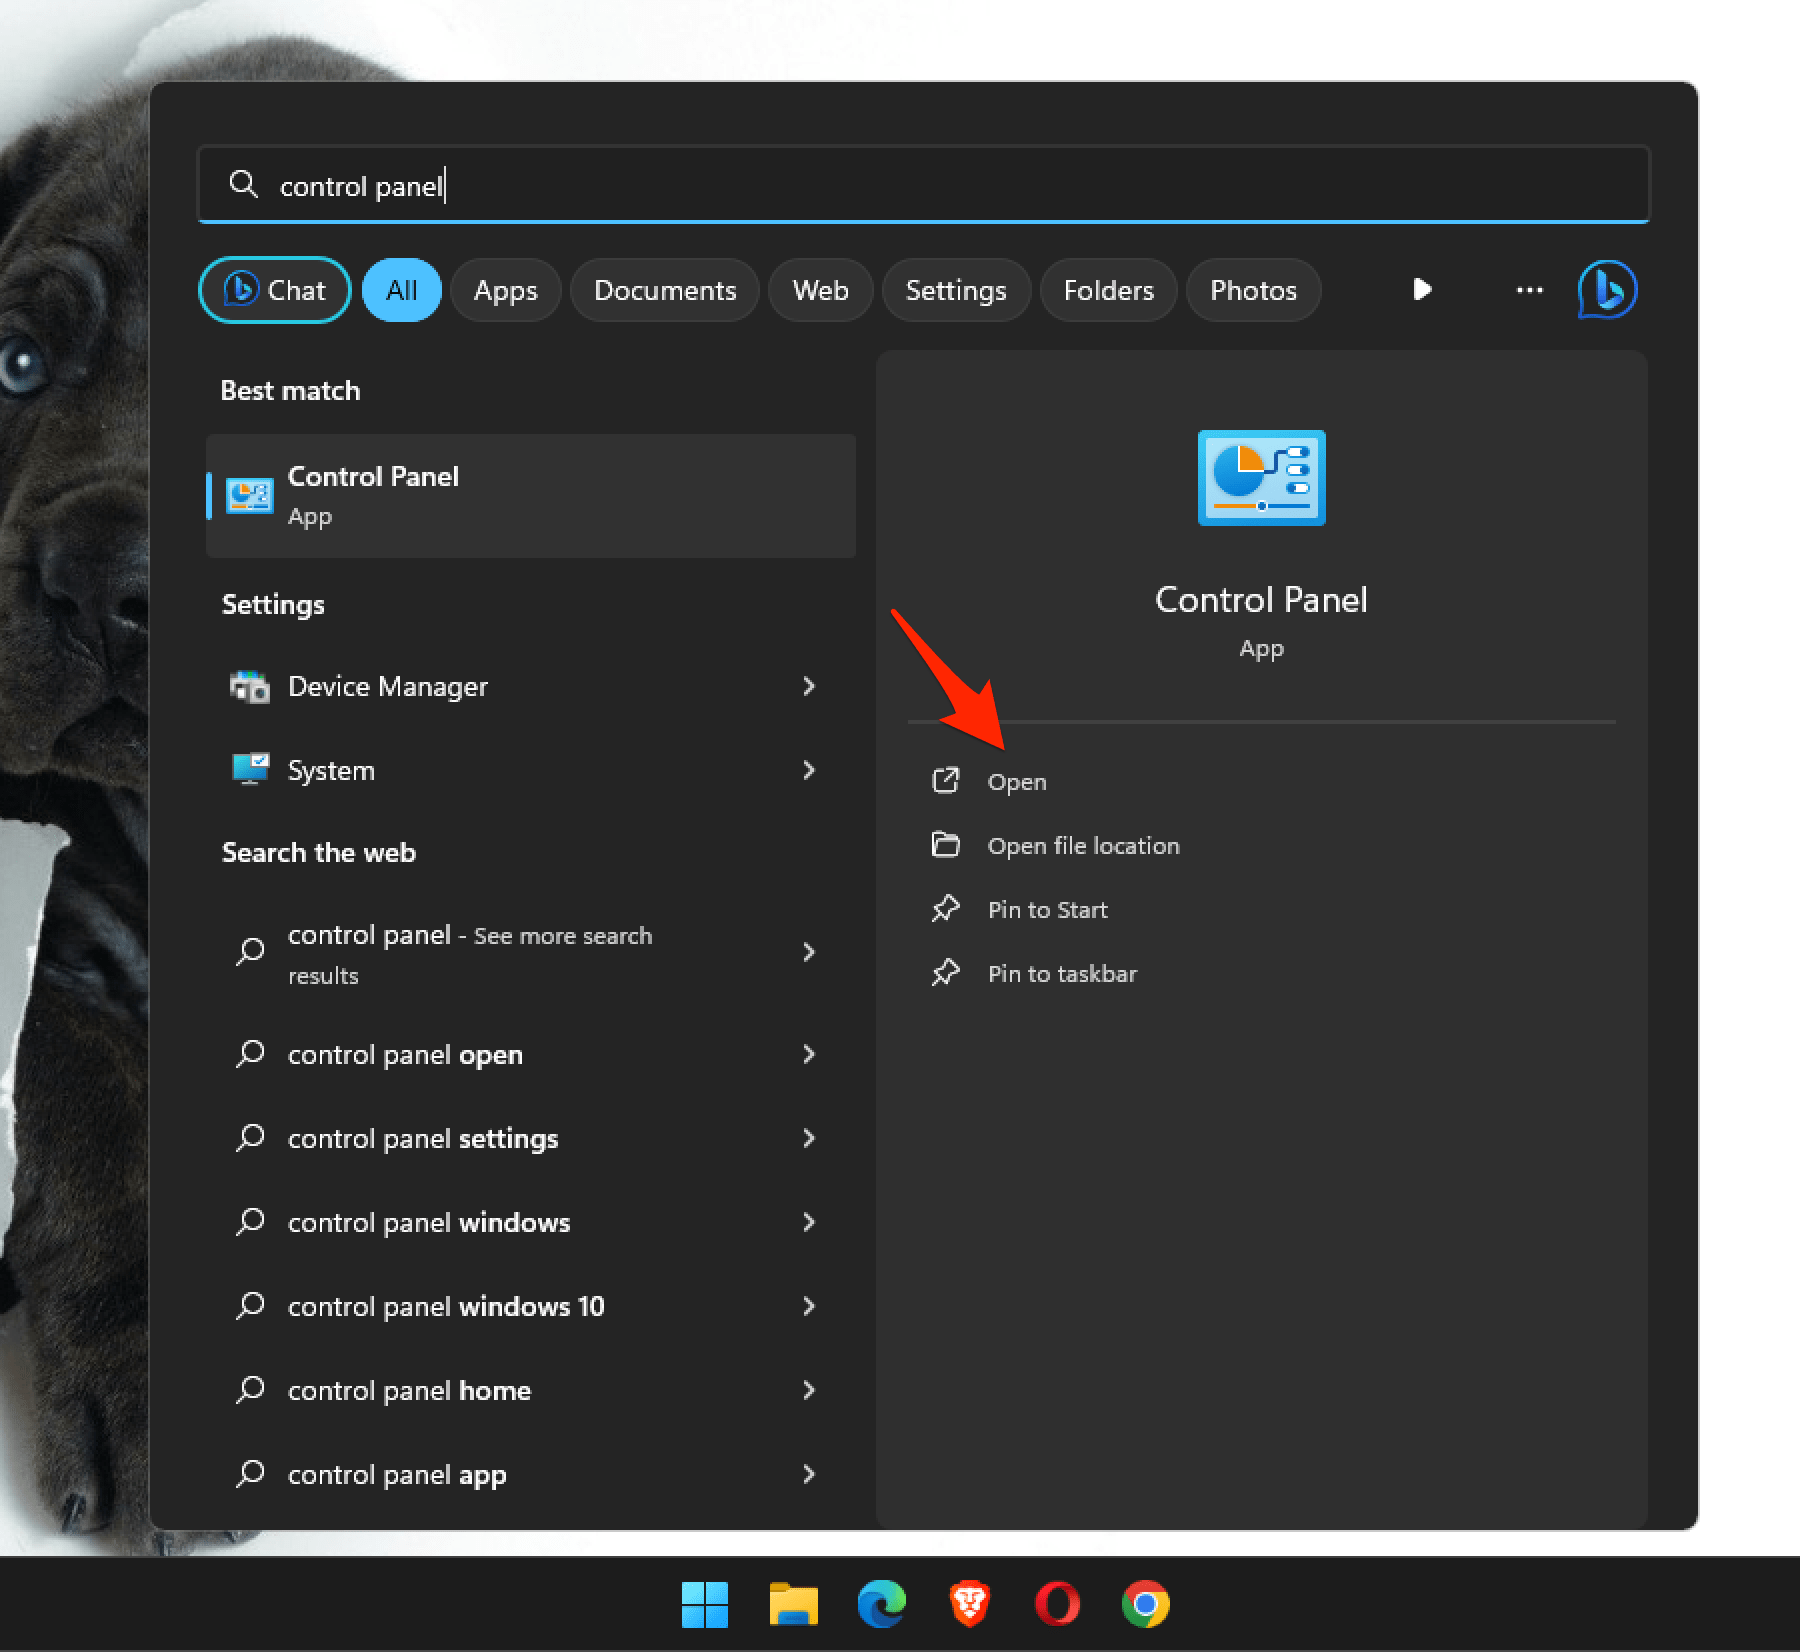 It will open the Control Panel window.
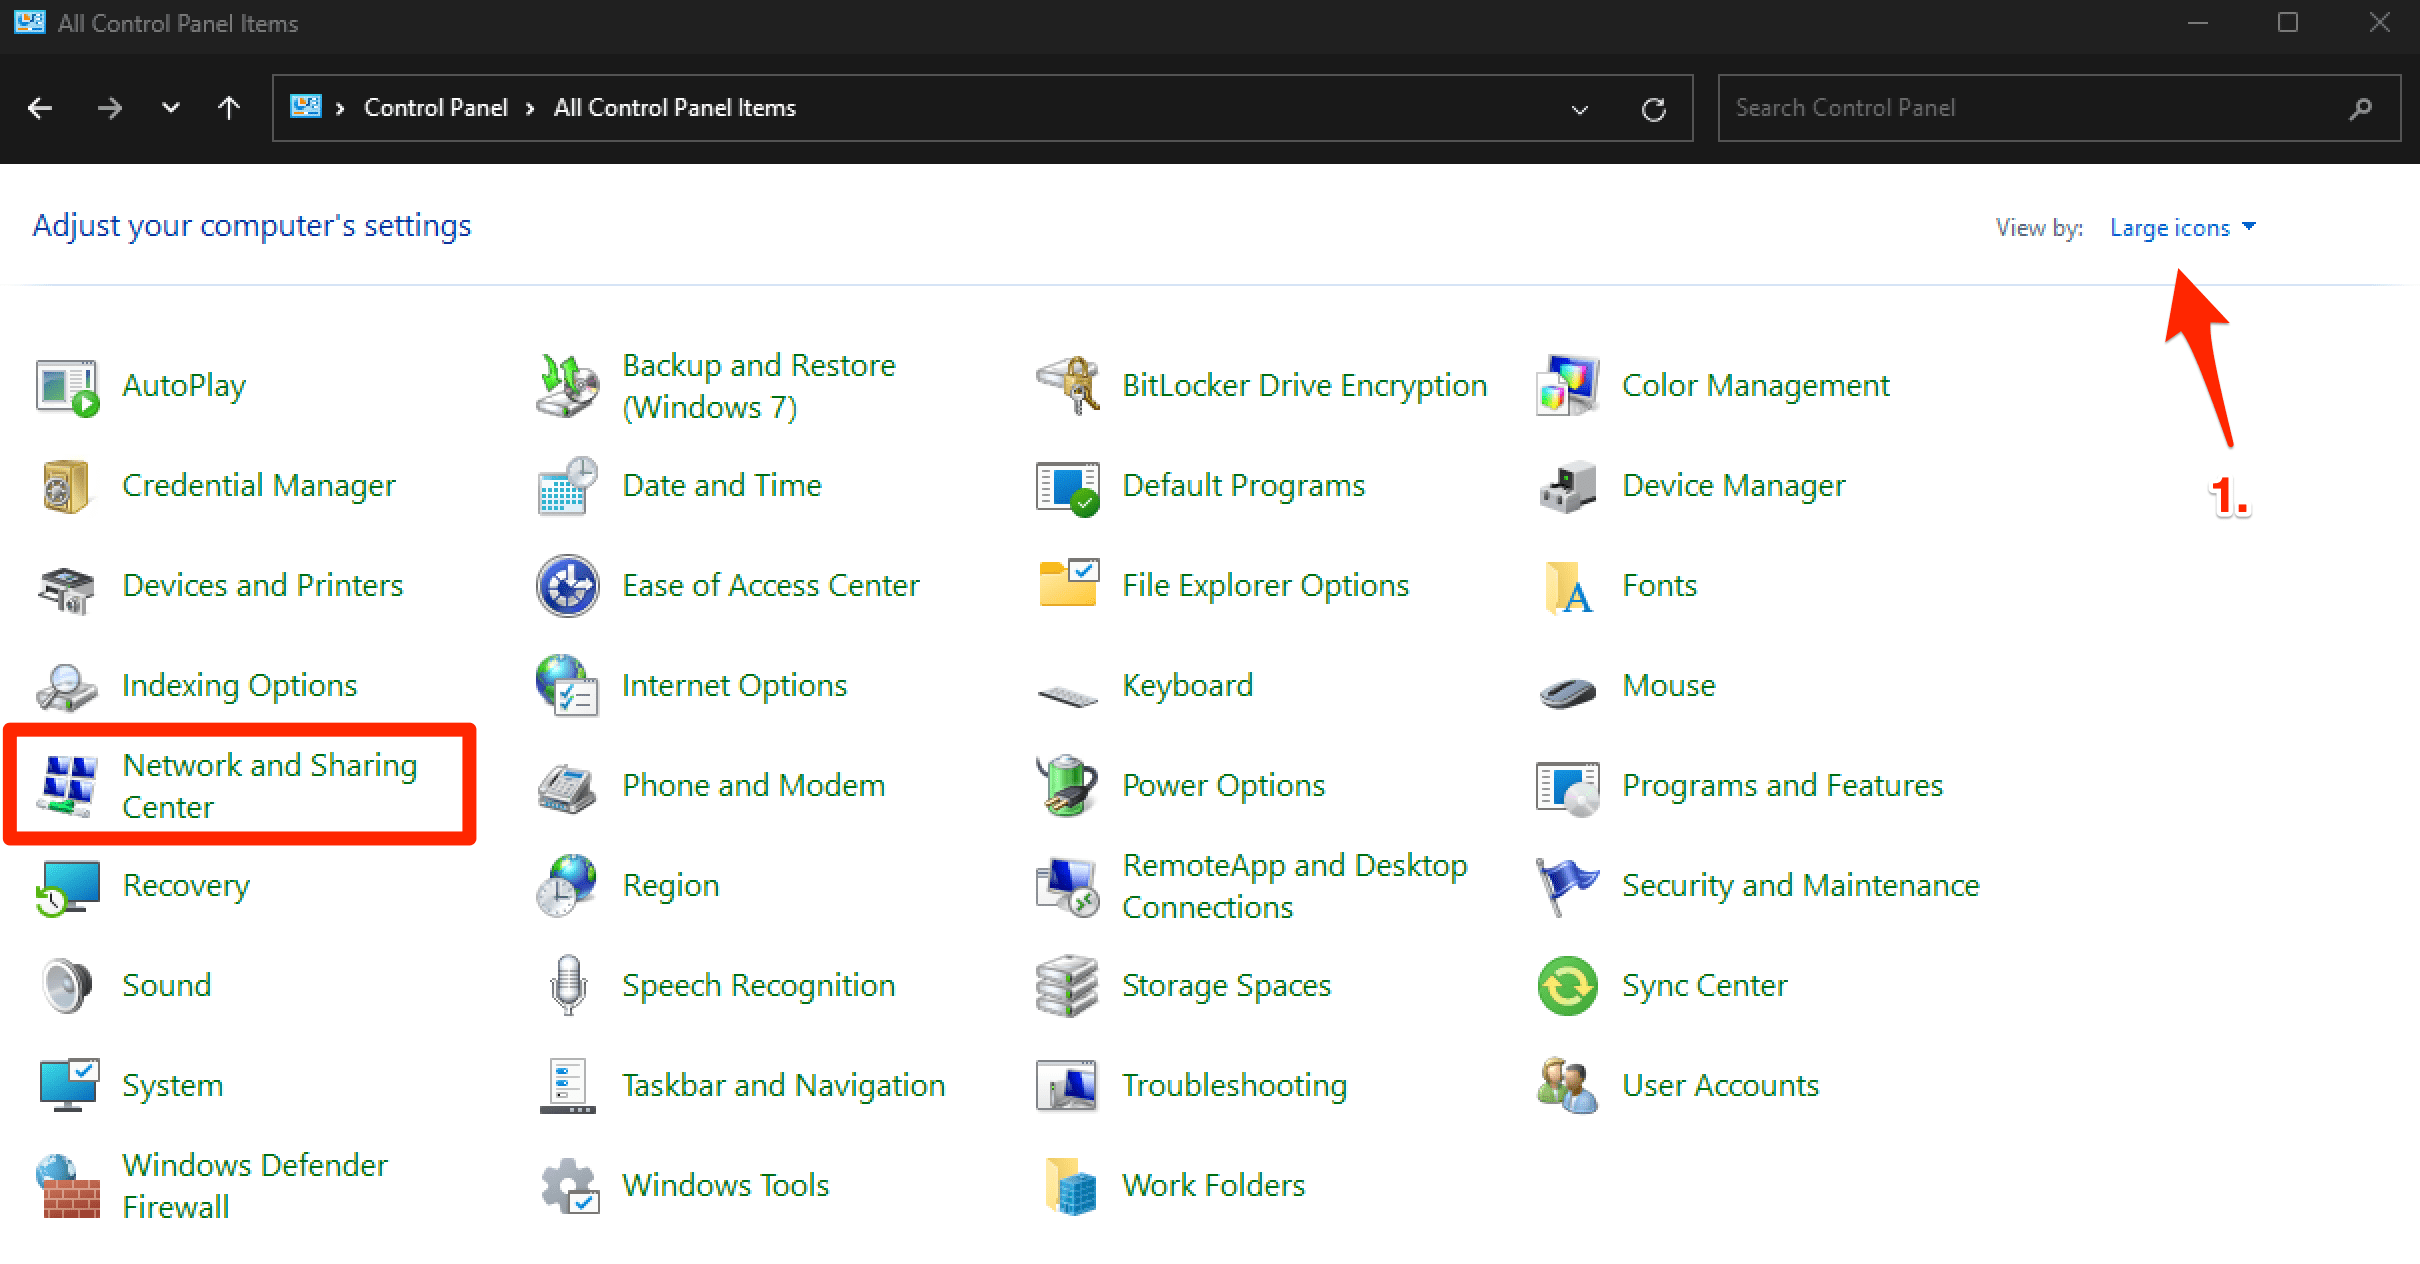
 - Switch the View by to Large icons option, and select the Network and Sharing Center menu.
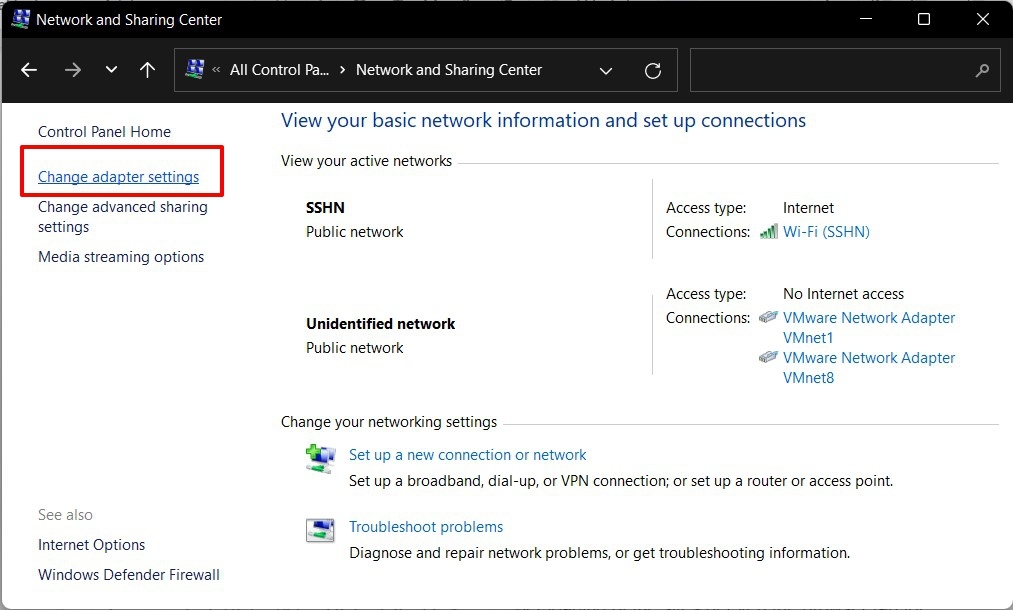
- Click on Change adapter settings from the left menu bar.
- Right-click on your active Network Adapter (Wi-Fi or Ethernet) for the context menu, and select the Properties command.
It will open the Adapters Properties pop-up window. - Double-click on the Internet Protocol Version 4 option.
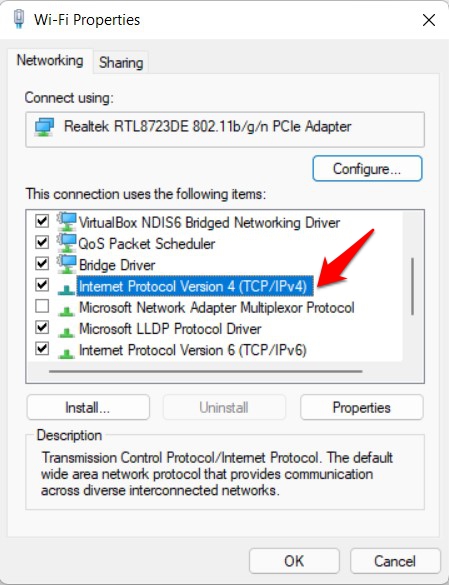
- Select Use the following DNS server addresses option, and input the following Google DNS Addresses.
Preferred DNS Address: 8.8.8.8
Alternate DNS Address: 8.8.4.4
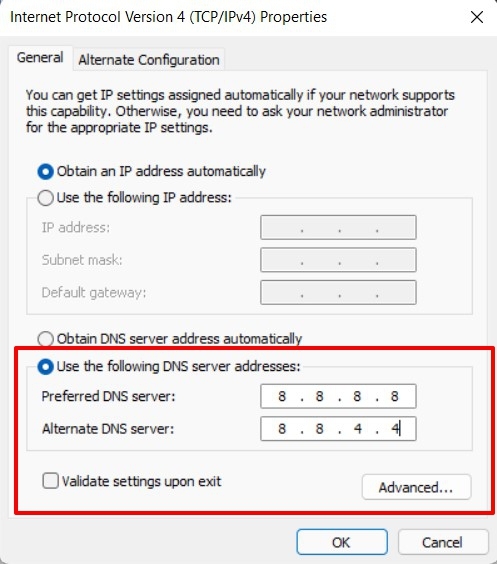
- Hit the button to save the changes.
It will change the DNS addresses of your network adapter on your Windows PC.
On macOS, open System Settings → Network, click your active connection, then Details → DNS. Remove any existing entries and add 8.8.8.8 and 8.8.4.4 (Google DNS) or 1.1.1.1 and 1.0.0.1 (Cloudflare). Click OK. Restart Chrome after you save.
Reset Chrome Settings to Their Defaults
If the earlier steps did not help, reset Chrome to its original defaults. This restores your search engine, homepage, startup pages, pinned tabs, content settings, cookies, and extensions in one pass. It is the strongest browser-level fix for lingering “Google is broken in Chrome” reports.
- Launch the Chrome browser on the computer.
- Click on the More for menu list, and select the Settings menu.
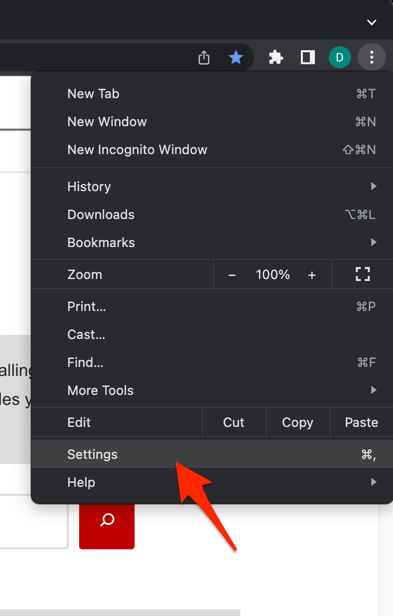 It will open the Chrome browser's Settings page.
 - Switch to the Reset settings tab in the left sidebar, and select Restore settings to their original defaults option.
- Finally, hit the command button.
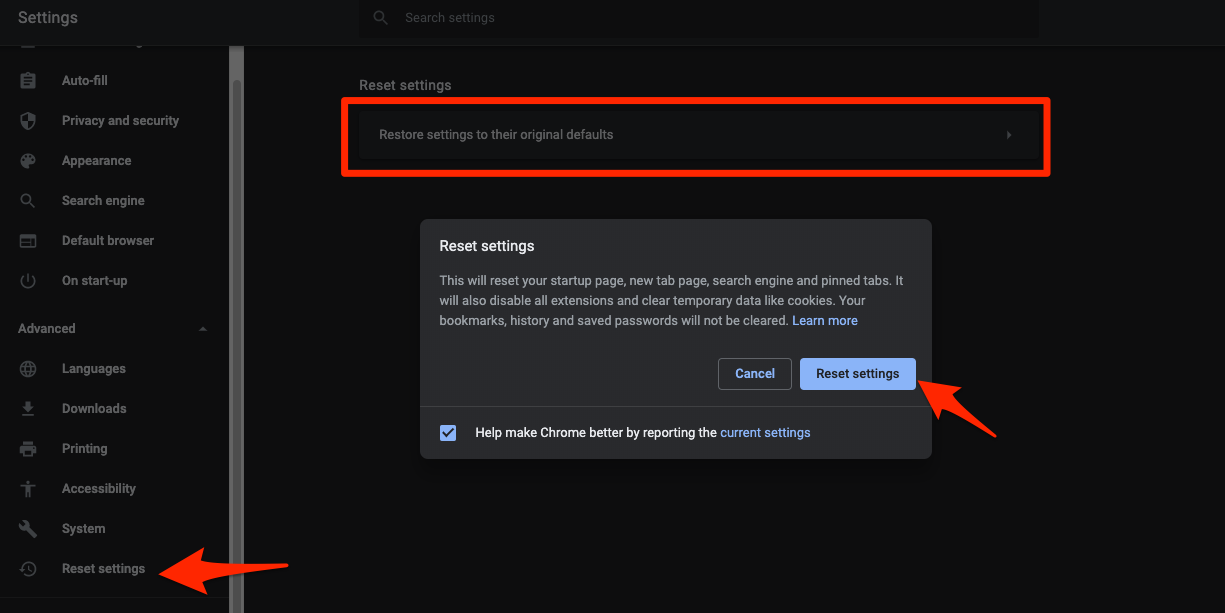 It will reset the Chrome browser settings, clear temporary data, and disable all extensions.
After the reset, sign back into your Google account and reload google.com. Your saved passwords and bookmarks stay in your profile. The reset only changes settings.
Reinstall Chrome as a Last Resort
If Google still refuses to load after a settings reset, the Chrome installation itself may be damaged. A full uninstall followed by a clean install is the last step you can take inside Chrome.

Deleting the leftover Chrome folder removes your local profile, including bookmarks and passwords that are only stored on this device. Sign in to Chrome and sync first, or back up anything you want to keep.
On Windows, open Settings → Apps → Installed apps, find Google Chrome, click the three-dot menu next to it, and choose Uninstall. Then delete the leftover folder at C:\Users\<YourName>\AppData\Local\Google\Chrome if it is still there. Download Chrome again from the official site and run the installer.
On macOS, open Finder → Applications, drag Google Chrome to the Trash, then empty the Trash. Re-download the installer from google.com/chrome and drag the new app to your Applications folder.
After reinstalling, sign into Google once. If Google still will not load, the problem is almost certainly outside Chrome: network hardware, ISP filtering, or a system-level security tool. Contact your ISP or run a full malware scan with Malwarebytes.