
The Mac allows users to add their contact information and address to store in the system.
These contacts can be retrieved in the Safari browser to autofilling the location or address details. The saved contact can be edited or deleted from the Contacts App.
In this guide, I have shared written instruction about:
Add an Address for AutoFill
Safari saves up a lot of time and makes it easier to fill in the same information all the time. Here are the steps to follow:
- Open the Safari browser app on Mac.
- Click on the Safari menu from the menubar.
- Select the Preferences… menu under Safari.
- Switch to the AutoFill tab within the preferences window.
- Enable the checkbox against Using information from my contact.
- Click on the Edit… command button against it.
- Hit on Plus

 and select the New Contact option.


- Enter the Name and Address details within the Contact fields.
- Hit on the Done button to add the contact with the address.
This will add the contact and address information for auto-filling the registration forms in the Safari browser.
Edit the Saved Address
Are you afraid that you can not change your address once filled in? Worry not; edit autofill Mac lets you edit your previous address to make necessary changes.
- Launch the Apple Safari on the Mac.
- Click on the Safari menu from the menubar.
- Select the Preferences… menu under Safari; this will open a new preferences window.
- Switch to the AutoFill tab within the preferences window.
- Enable the checkbox against Using information from my contact.
- Click on the Edit… command button against it.
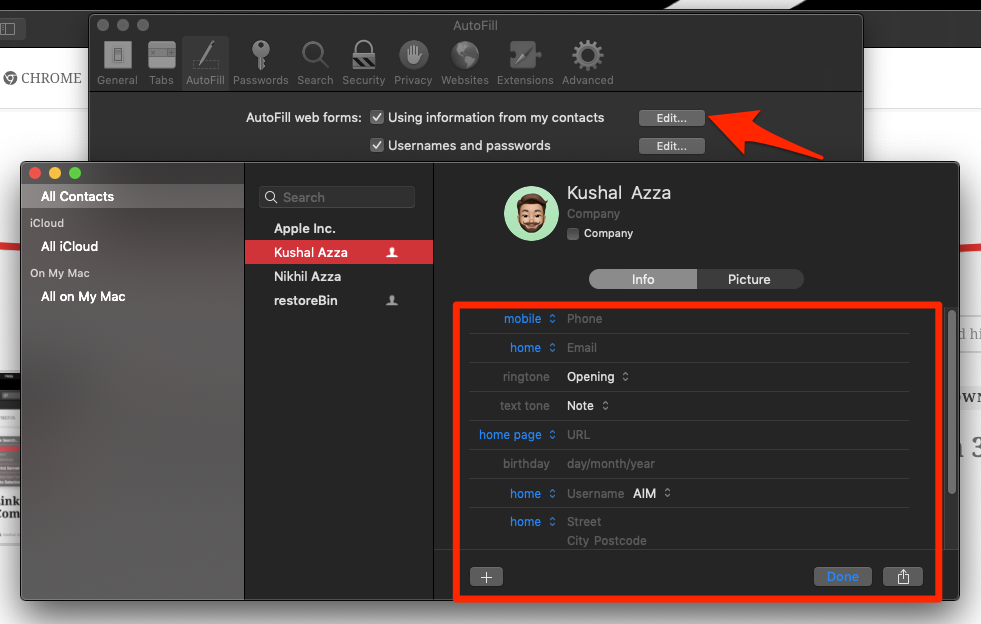

- Choose the existing contact or company from the list.
- Edit the Address details within the Contact fields.
- Hit on the Done button to make changes.
This will edit the address and modify the changes within the address details for autofill. Next time you use the autofill option, the new address details will be displayed in the browser.
Delete the Saved Addresses
Once you think the current address is no longer helpful, you can delete it permanently. Delete autofill Mac lets you delete unnecessary information if you have changed your residential address.
- Launch the Safari browser app on Mac.
- Click on the Safari menu from the menubar.
- Select the Preferences… menu under Safari; this will open a new preferences window.
- Switch to the AutoFill tab within the preferences window.
- Enable the checkbox against Using information from my contact.
- Click on the Edit… command button against it.
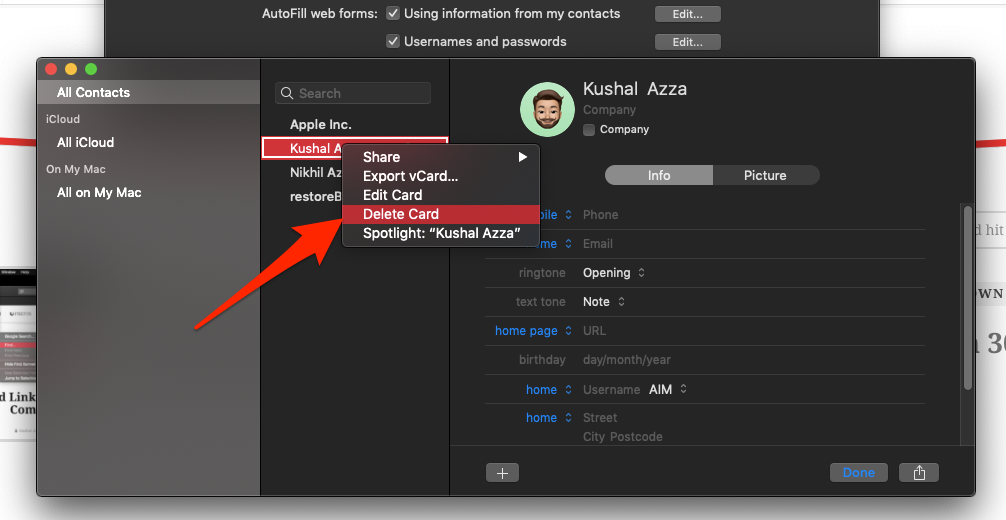
- Choose the existing contact or company from the list.
- Right-click on the contact name for more options.
- Select the Delete Card command option from the list.

It will remove and delete the address and contact from the autofill. The address will no longer be available for auto-filling the form.
Bottom Line
The autofill feature on Mac is considered one of the most valuable features of the Safari browser. With the help of this, you can add, edit, or delete your addresses as per your requirement.
Similarly, you can add and manage the addresses for autofill in Safari on iPhone and iPad. Just choose your default address contact from the Contacts app.
Lastly, if you've any thoughts or feedback, then feel free to drop in below comment box. You can also report the outdated information.


How to autofill my email address