
The Firefox Developer regularly releases updates with new enhancements and bug fixes; however, for any reason, if the new version is not working as expected, then you can downgrade to the previous build.
You can download an older Firefox build from the online repository, install it on the computer, and disable the automatic update option from the settings. It’s generally not recommended to stay on the older version.
In this guide, I have shared written instruction about:
Step 1: Download the Previous Firefox Build
Mozilla Firefox automatically archives the order builds or releases in an online repository that we can download for free. We can browse through the build number to download the required version.
- Open the Firefox directory listings on the web browser.
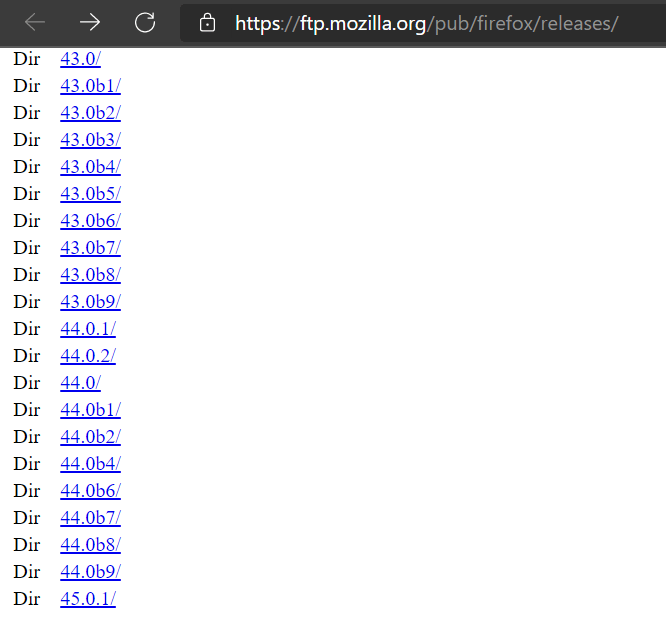
 It hosts older browser builds, some dating from 5-6 years old.
 - Please scroll to the version of your choice and select it.
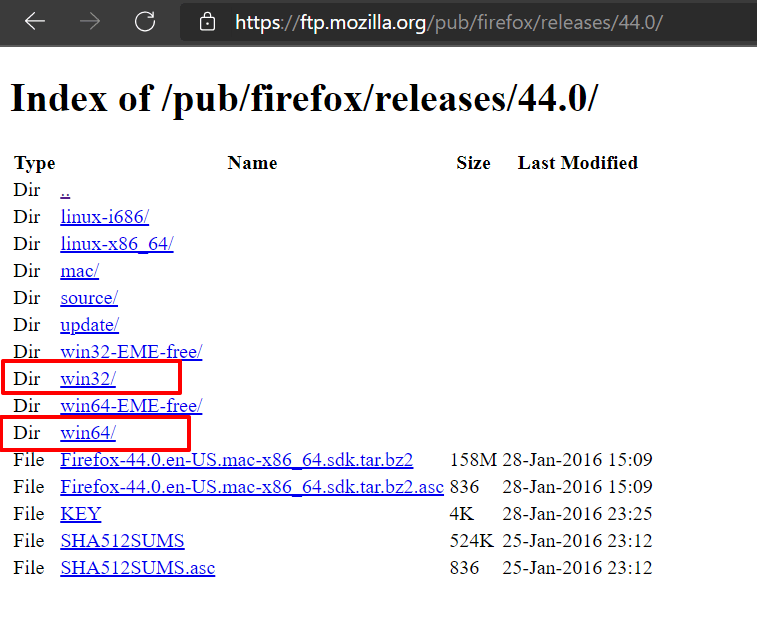
You should now see various builds of Firefox corresponding to your OS. - Choose the directory per your system configuration. (say, Windows)
Furthermore, you will see two different architectures*, 32-bit and 64-bit, under Windows. - Select the one that matches your CPU architecture.

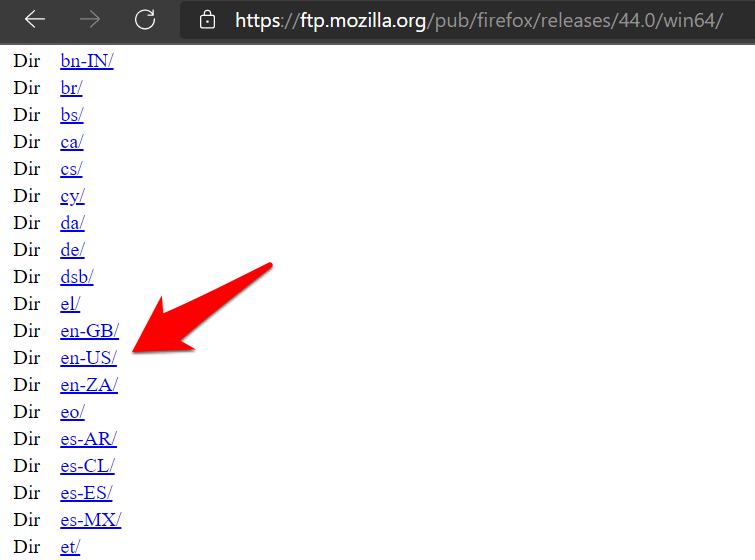
- Select your language and region. As for this guide, we are choosing English US, so it translates to en-US.

- Finally, download the .exe file corresponding to your selected version.


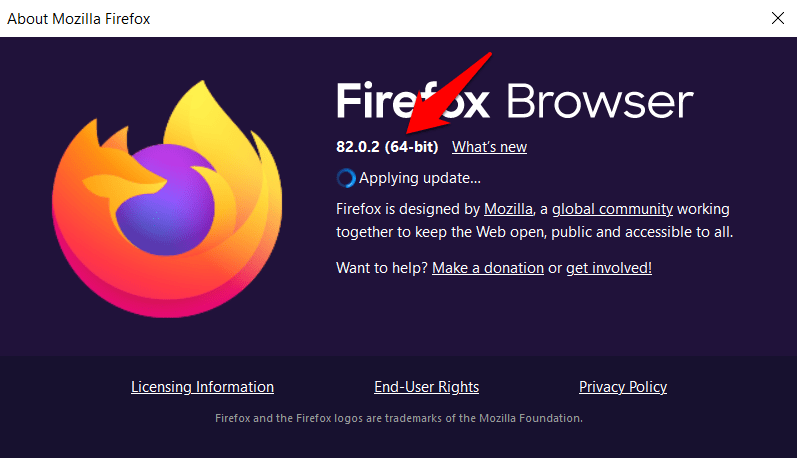
TIP: If you aren’t sure about system architecture, tap on the More ![]()
![]() menu at the extreme right of Firefox. Then go to Help > About Firefox, and you should find the architecture mentioned there.
menu at the extreme right of Firefox. Then go to Help > About Firefox, and you should find the architecture mentioned there.
Step 2: Install the Older Version for Firefox app
Now that the older version has been downloaded to local storage. We can proceed to install and overwrite the older version over the current installation. Here are the steps to follow:
- Double-click on the downloaded .exe file to launch the setup file.
- Click on the in the welcome screen and select the setup type, out of Standard or Custom.
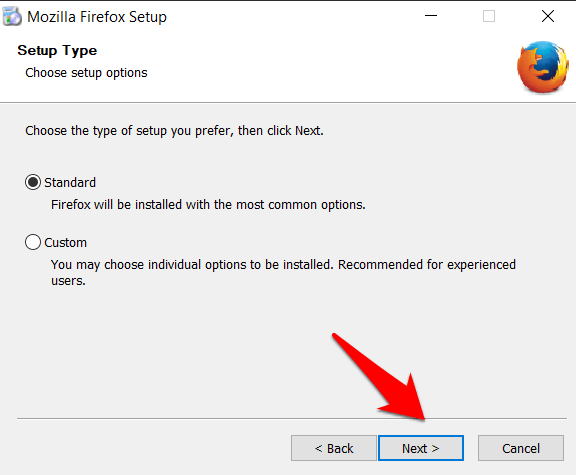
 If you aren’t sure if the same, then go ahead with the Standard one.
It will now scan for the installation directory and find the location where the existing version is stored. - You must hit the button and wait for the process to complete.
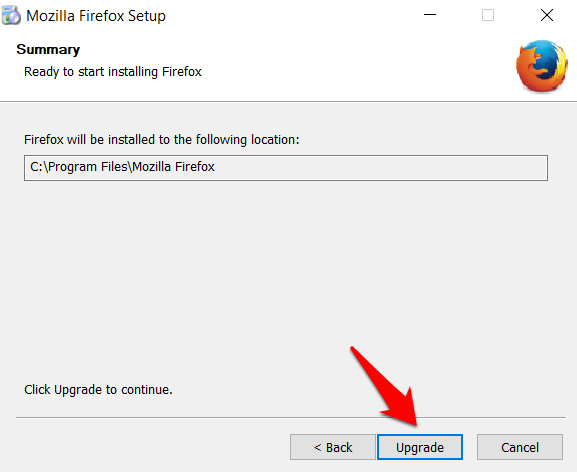

That’s it. You have successfully downgraded to an earlier build of Firefox. There’s just one thing left to do- disable its Auto-Updates feature.
Note: If the older build is unable to overwrite the latest Firefox version, then you should uninstall the Firefox browser from your computer and install the downloaded version.
Step 3: Disable the Automatic Updates
By default, Firefox checks for the latest updates and, if found, will download and install it automatically. At the same time, it may be useful in the general scenario but not under the current circumstance where you have manually downgraded to an earlier build. Here are the steps to disable updates:
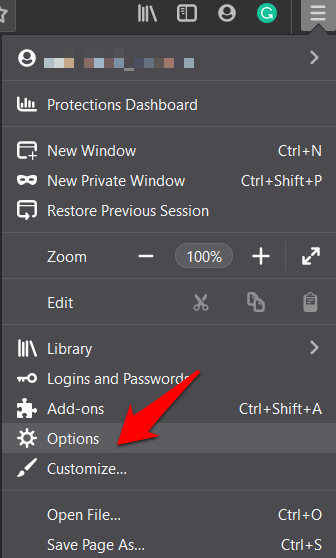
- Launch the Firefox app on the computer.
- Click on the More

 menu and select Options from the menu list.
 It will open the General section in Firefox.
 - Please scroll to the Firefox Updates section and select Check for Update but let you choose to install them.
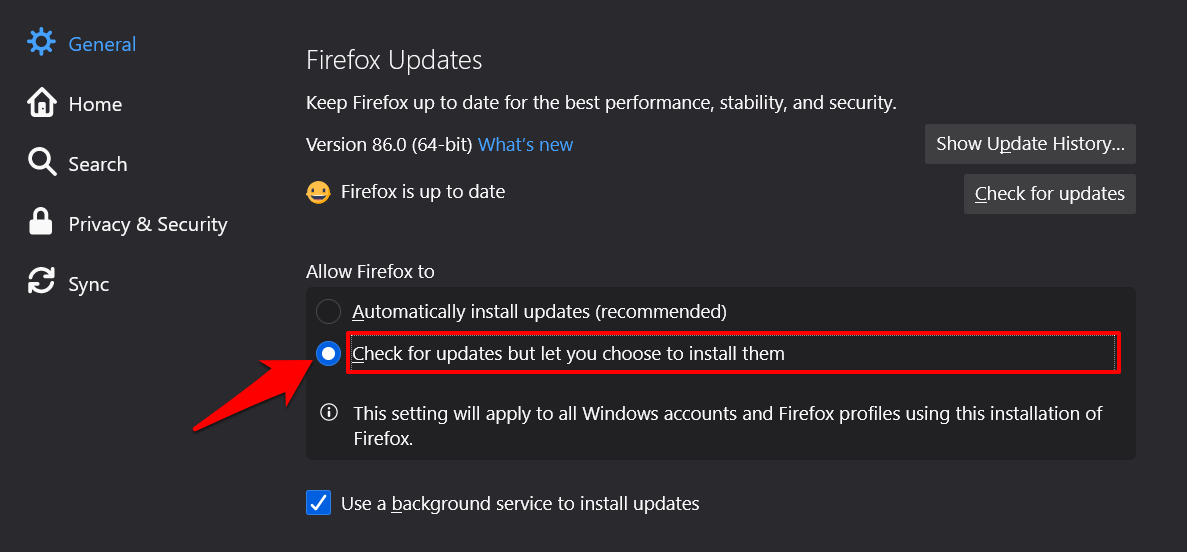

You should also disable the checkbox for Use a background service to install updates option.
It will disable the automatic updates on the Firefox browser. Though this will check for the newer version, it won’t install unless you manually confirm to update.
It’s not recommended to stay on the older version for a long; successive versions can have the fix or patch release for the issue you are facing. Hence, keeping your Firefox browser up to date is highly recommended.
Bottom Line
So this was all from this guide on downgrading and installing an older Firefox browser version. While the general rule of thumb states that you should always be on the latest build, you might have to deviate from this route in some instances.
The Firefox has the repository for all the builds, that you can download and downgrade.
Lastly, if you've any thoughts or feedback, then feel free to drop in below comment box. You can also report the outdated information.


A big help. Thanks a lot!
You did not comment on if I need to delete firefox first?
Yes, you need to uninstall and clear the data of Firefox in order to install the previous version.
I just despise all these new versions. used to be able to pull the current “cookies and data’ window off to the side, and watch all the stuff load, then cancel/delete things I didn’t want tracking me. Now its hidden in the preferences section, making it a chore to go see what is there, and delete.
Is there a way to STOP the stupid picture in picture dropdowns and autoplay of commercials??? Freeze the idiot dancing gifs. silence the autoplay audio unless you choose volume? etc.
Every new version seems to LOSE FREEDOM to choose. I don’t WANT a pile of apps updating in the background, playing banners, shouting commercials at me unless I click on them.
Or is there a simple browser somewhere that is totally customizable, that isn’t a snooping tool selling me
continuously to anyone they can find??
sadly the answer is still no, but older versions of ff are much better
as you well know
Helped lot.
The open tabs look like Shite in the Ver 89. Can hardly see what is the active tab. Doesn’t matter what theme I use. Bad update.
Totally trashed searching from FirefoxBlank page, insisting the search prase I type is sent to the address bar as a url. If I press the setting icon in the bar theeen I can say “search with Google” or whatever search engine I want. Sites are now displayed on the new tab as The 1st letter of the sitename, not helpful having to look through 5 or 6 “S” names to find the one I want. Used to be able to easily locate by the site icon. Off to downgrade now.
The new Firefox Version of 89.0 doesn’t meet my expectations. So, I’ll downgrade to an older version.
Hello Dr. Manfred, may I know what you didn’t like about the new Firefox update?