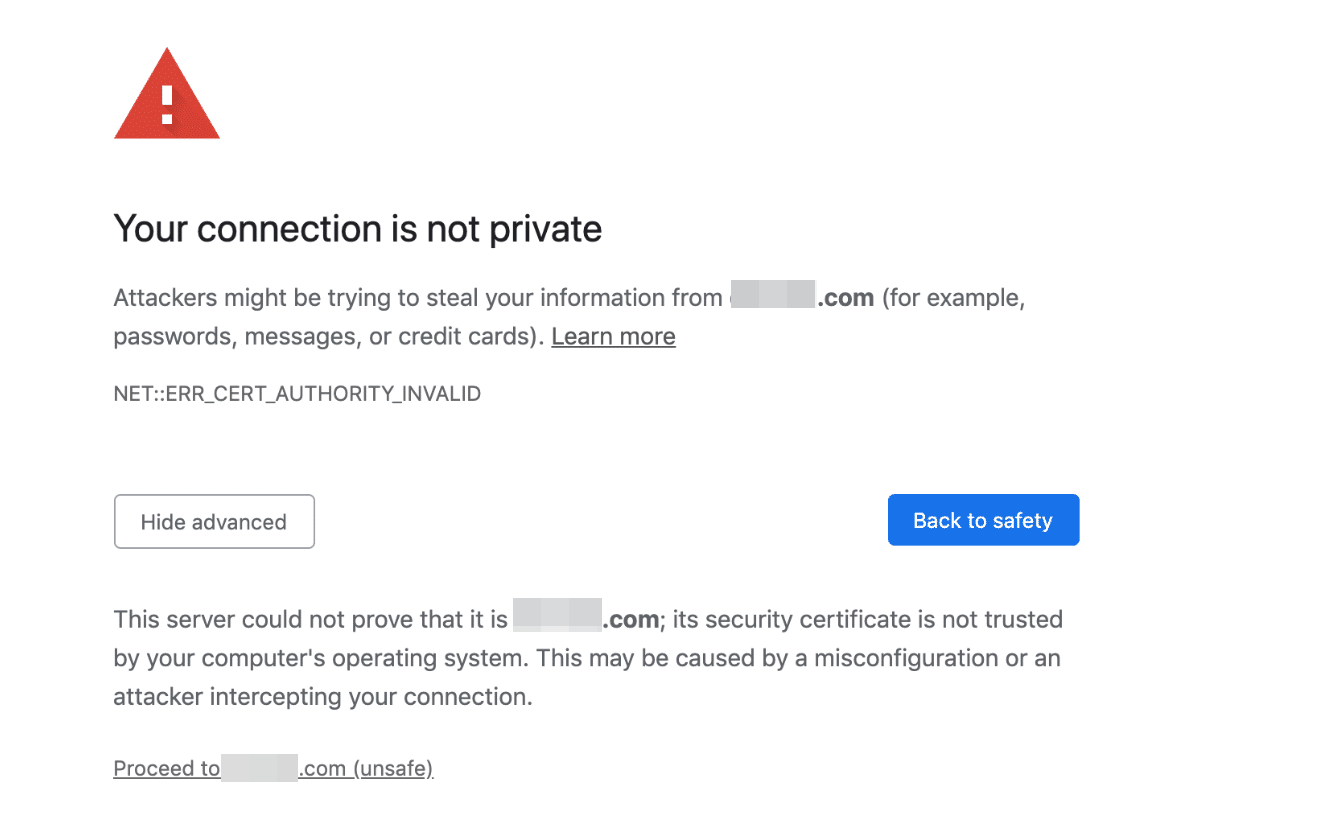
If your browsing site uses an outdated version or an expired SSL certificate, the Chrome app might give you ERR_CERT_AUTHORITY_INVALID with a connection that is not private.
In such a case, you can check the SSL certificate expiry, disable the firewall’s SSL check, delete the system’s SSL-cached files, and delete Chrome’s cache to fix the issue.
In this guide, I have shared written instruction about:
Method 1: Check Certificate Information
One of the first things you should do is check the site certificate information. It will help us to understand why the certificate has failed, which resulted in error. If the certificate has expired, it’s obvious that the issue is from the website end, and you can’t do anything about it. Here are the steps to view site certification information:
- Launch the Google Chrome browser on your computer.
- Open the Website to check the certification information.
- Click on the Padlock
 within the URL bar.
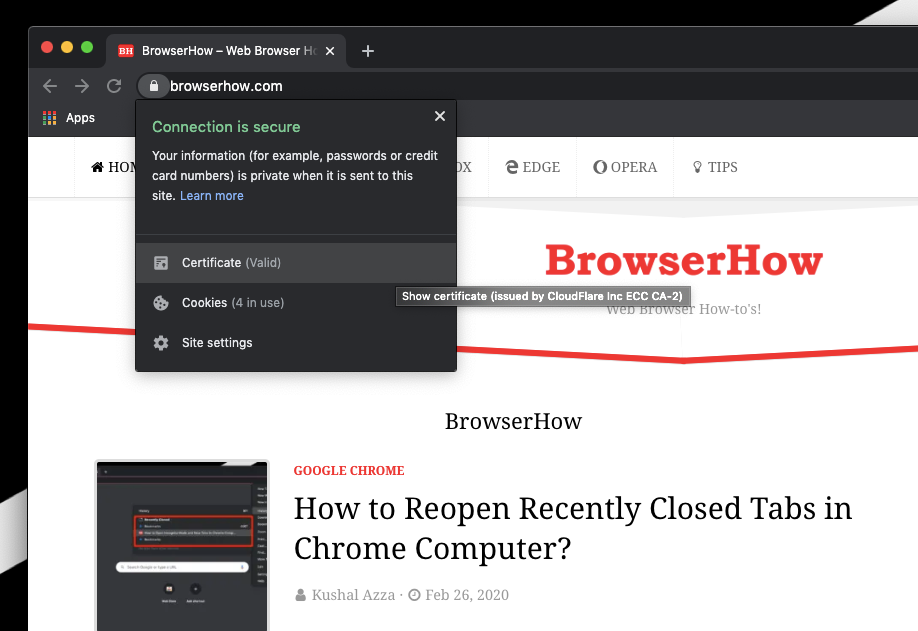 Check if the site connection is secure or not.
 - Click on the Certificate to open for more information on validation.
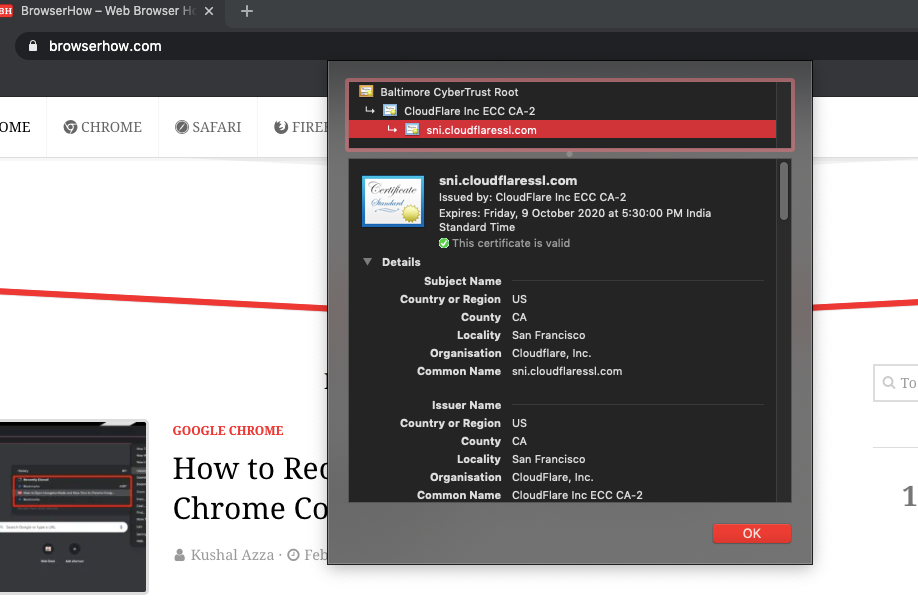
Here, you can check the certificate expiry and other important information like organization, issued to, issuer name, etc., which help in understanding the certificate’s authenticity.
Method 2: Disable Firewall’s SSL Check
Most antivirus programs come embedded with the Firewall app as well. The primary function is to prevent users from accessing sites that don’t follow the SSL protocol. At the same time, they also give users the flexibility to disable this setting temporarily.
Regarding the error, it might be the case that the Firewall isn’t letting you access the non-SSL websites. To bypass this restriction, you might need to disable this functionality of your Firewall/Antivirus app. Here’s how it could be done:
- BitDefender: Settings > Privacy Control > Antiphishing > Set Scan SLL to Off.
- Kaspersky: Settings > Extend > Network Settings > Disable SSL Settings.
- Avast: Settings > Active Protection > Web Shield > Customize > Untick the Enable HTTPS Scanning option.
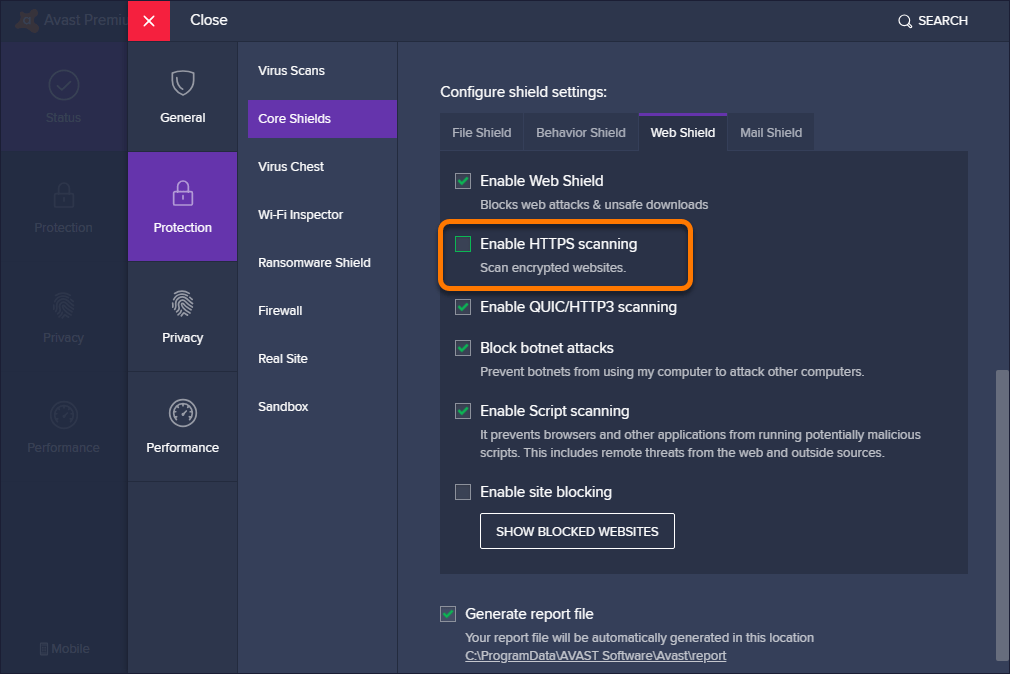
On the other hand, there isn’t any option to disable SSL on Windows Firewall. You could instead temporarily disable the Firewall while you are browsing the site.
- Open the Start menu and search for Windows Defender Firewall.
- Click on Turn Windows Defender Firewall On or Off from the left menu bar.
- Enable the checkbox Turn off Windows Defender Firewall under both the Public and Private networks.
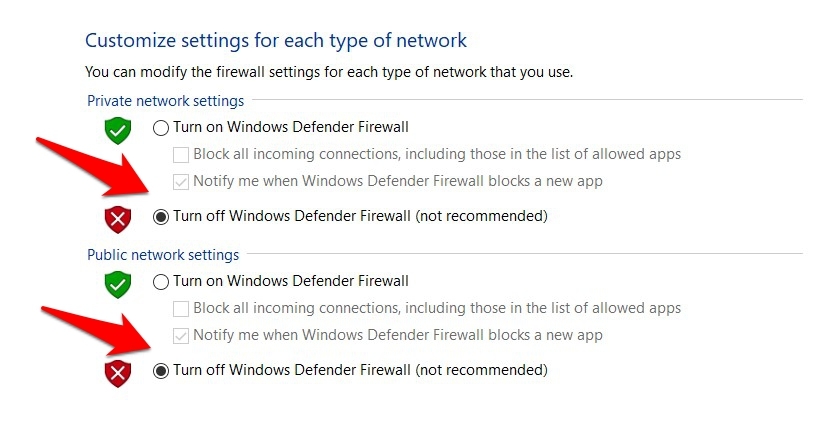
Do keep in mind that browsing the web while keeping the Firewall disabled might prove to be quite risky. So only do so if visiting that website is paramount and there are no alternatives.
Method 3: Clear Chrome Browser’s Cache
Sometimes, the website might have already updated its SSL certificate, but your browser still load the older certificate from it’s storage. To fix this issue, you must delete the browser’s cache files. Here are the steps to do so:
- Launch the Chrome browser and head over to its Settings page.
- Then scroll to the Privacy and Security section and click Clear Browsing Data.
- Select Cookies and other related data and Cached images and files.
- Likewise, also change the Time Range to All Time.
- Finally, hit the button.
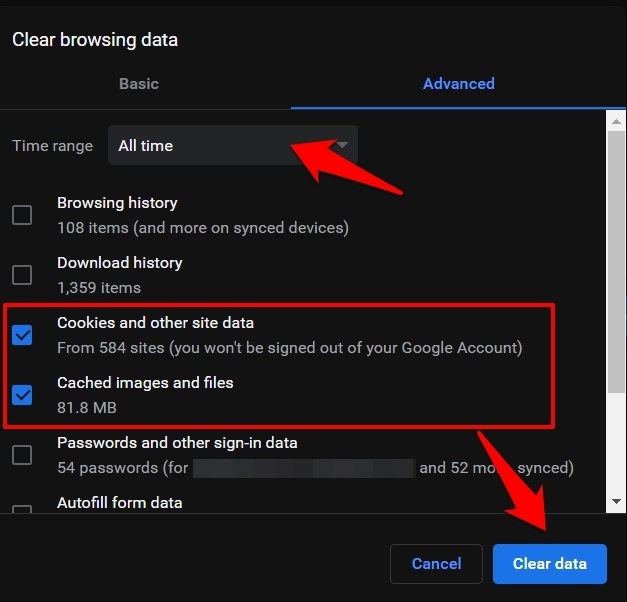
Once the temporary files have been deleted, relaunch Chrome and check whether the error has been rectified.
Method 4: Delete the System’s SSL Cached Files (Windows)
Verifying each time the Secure Socket Layer is implemented in the websites might slow down the entire load time of the concerned sites. In this regard, the system saves the SSL state for each website you visit. So rather than performing the SSL check repeatedly, the browser picks up this information from the system’s cached SSL files.
However, if the concerned site has just added or updated its SSL, it wouldn’t be reflected in your browser (since it is still picking up the older cached files). So to rectify this issue, you should consider deleting the system’s preserved SSL states.
- Launch Control Panel via the Start menu.
- Change its View by menu to Large Icons and select Internet Options.
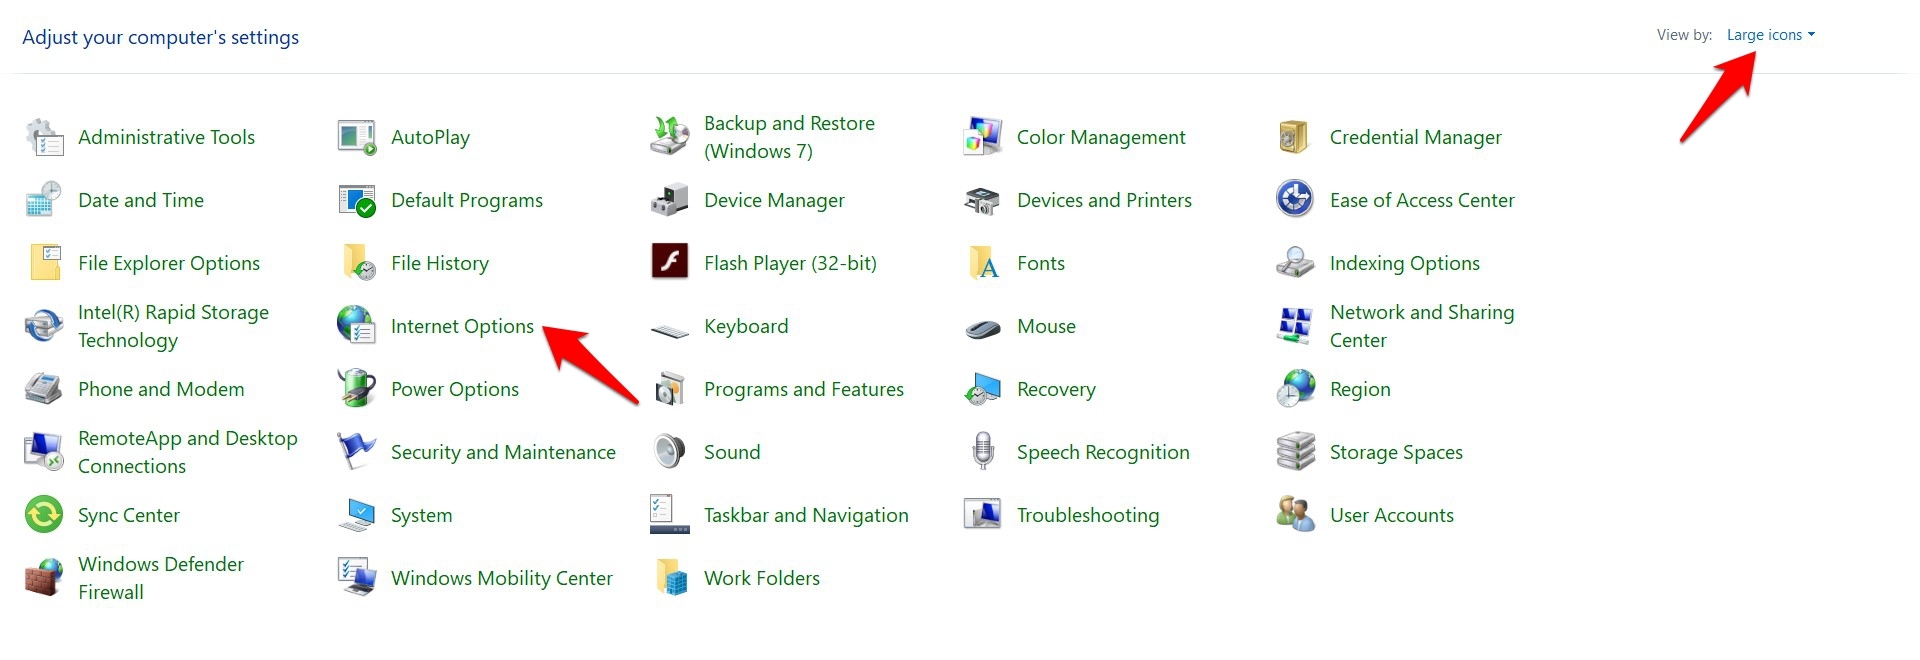 The Internet Properties window will open.
 - Switch to the Content tab and hit on the Clear SSL State command.
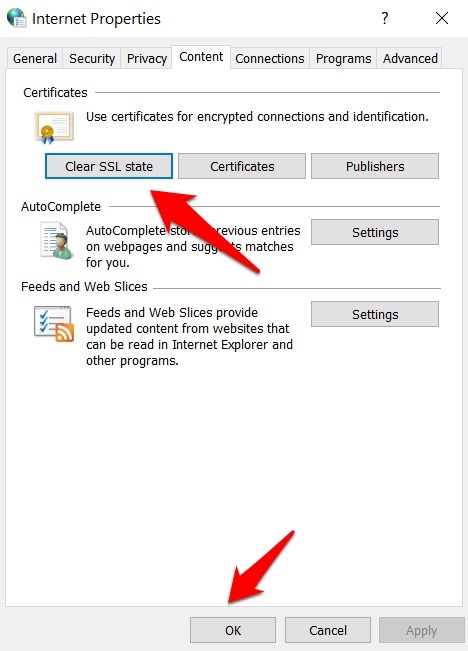
- Once that is done, click and then .
Now reopen Chrome app and see if the error has been fixed. The biggest drawback with this method is that it deletes the stored SSL state of all the websites (rather than giving us the option to do so for our chosen site).
As a result, the next time you browse any site, it will first perform the SSL check from scratch, which might delay in site loading.
Bottom Line
In this regard, the HTTPS protocol and the SSL Certificate are among the most important prerequisites. Any issues with its authentication might lead to an error. Fortunately, you are now aware of the methods to rectify it.
With that said, the second method, in my case, gave out desirable results. The website I was browsing had just renewed its SSL certificate, but the browser was still loading the cached data of that site. The issue was rectified after deleting those cache files and reloading the site.
Lastly, if you've any thoughts or feedback, then feel free to drop in below comment box. You can also report the outdated information.


