Resolving host status messages occurs when the browser’s DNS service tries to resolve and connect the domain name assigned to the host IP address. However, it may sometimes be delayed due to changes in the registrar’s DNS entry.
To fix the issue with resolving the host, you can clear the existing DNS cache, reset the network settings, switch to a public DNS address, check your internet stability, etc., for troubleshooting delay.

Many other concerned users have also lined up their complaints across the Google Support Forums.
In this guide, I have shared written instruction about:
Method 1: Delete Browser DNS Cache
Your system holds DNS data for every site you visit. This helps the browser to directly pick the information from this cache rather than loading it from scratch.
However, if many such cache files get accrued, the browser might be unable to use the correct DNS entry, and the site would fail to load.
- Launch Google Chrome on the computer.
- Type in chrome://net-internals/#dns in the address bar, and hit key.
- Hit the button.
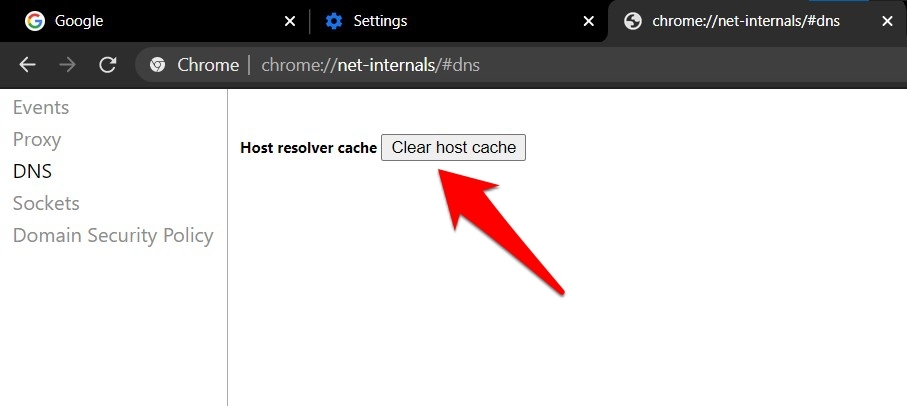

- Restart the browser.
Now verify if the underlying issue has been fixed or not. While deleting the DNS cache might slow down the website load time for a few seconds, it’s just a one-time delay. So it’s worth the wait.
Method 2: Switch to Public DNS Address
Your Internet Service Provider (ISP) sets up your DNS by default. However, in some instances, you could consider manually switching over to a public DNS like Google DNS, Cloudflare DNS, etc. This has been known to fix many DNS-related issues.
- Launch Control Panel and change the View By Type to Small icons.
- Select the Network and Sharing Center menu.
- Click on Change Adapter Settings from the left menu bar.
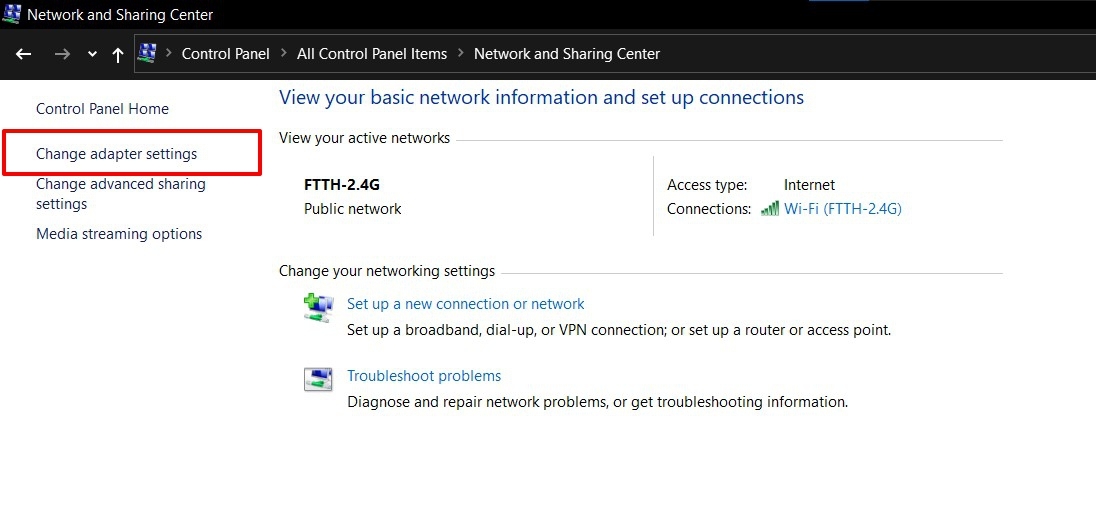

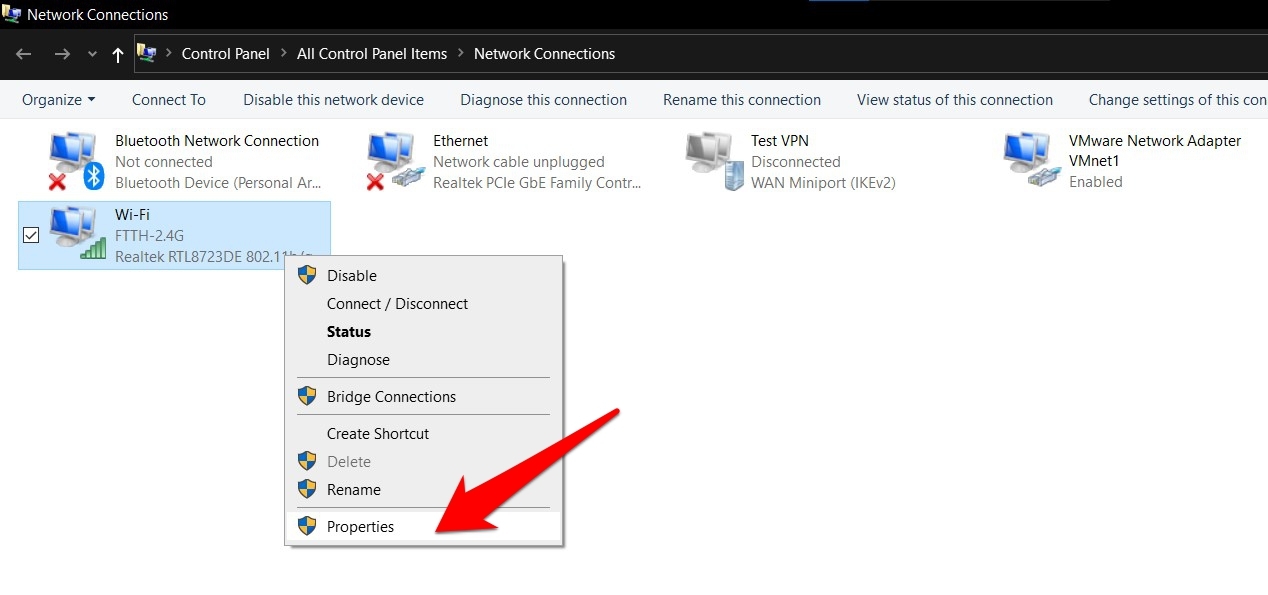
- Right-click on the connected network for the context menu and select Properties.

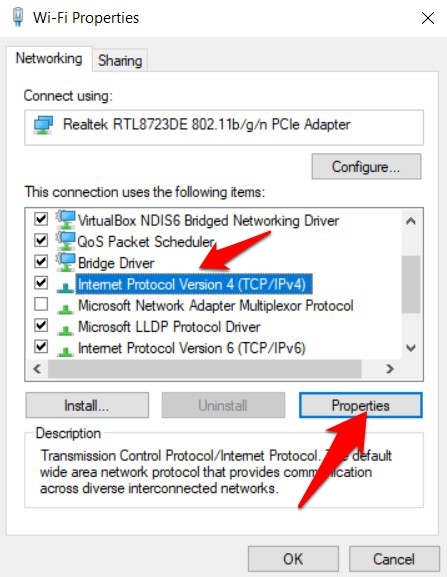
- Select the Internet Protocol Version 4 option, and click on the button.

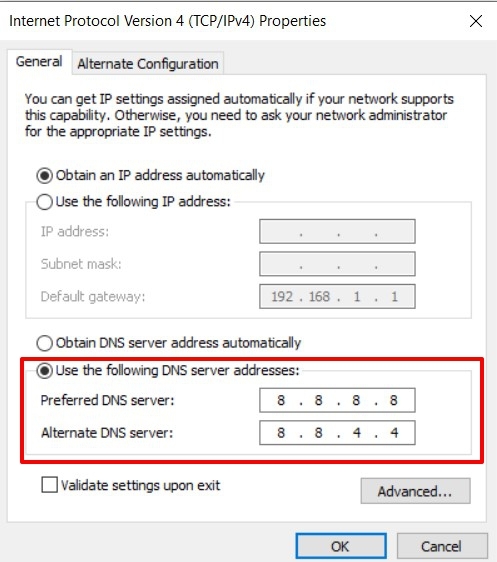
- Switch to the Use the Following DNS server address option.
- Type in 8.8.8.8 under Prefered DNS Address, and 8.8.4.4 under Alternate DNS Address.

- Hit to save the changes.
Besides Google, Cloudflare has recently made its DNS available, whose address is 1.1.1.1. So if the Google DNS one doesn’t yield the desired results, you may try out Cloudflare.
Method 3: Reset IP Configuration
TCP/IP is a set of networking rules that govern the interaction of two or more computers over the internet. But there could be a slew of network-related errors if there are any issues with the Transmission Control Protocol (TCP) or the Internet Protocol (IP).
The safest bet is to flush the current IP and renew another one. Follow the steps to reset the IP configuration:
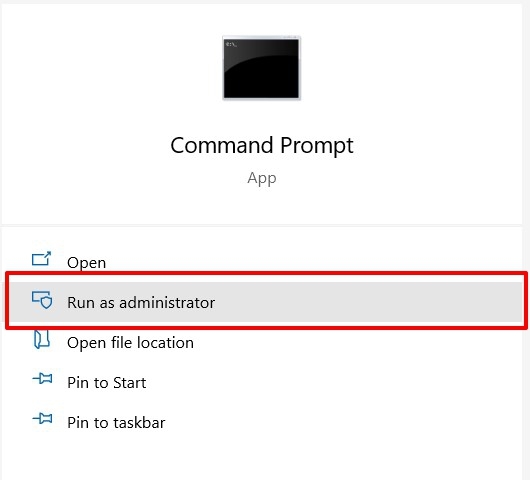
- Open the Start menu, and search Command Prompt.
- Launch Command Prompt as an administrator.

- Now execute each of the below three commands, one at a time:
ipconfig /release
ipconfig /flushdns
ipconfig /renew
- Relaunch the Chrome browser.
Now check if the issue has been fixed or not. Do keep in mind that your IP address has now been changed. So if you need to enter IP anywhere manually, use the newly generated one.
Method 4: Refresh DNS Client
The DNS Client service is constantly running in the background. Sometimes, this service can resolve the domain names but fails to cache them. As a result, the entire process would come to a halt. In that case, you should consider refreshing it so that it starts afresh.
- Open the Run dialog box using + shortcut keys.
- Type in services.msc, and hit key.
- Scroll to DNS client service, right-click, and select the Refresh command.


- Restart Chrome and check if the issue has been fixed or not.
If there’s an issue with this client, then all the associated network services couldn’t start up, let alone function properly. So refreshing that it might become the need of the hour in those cases.
Method 5: Disable Auto Complete Feature
Chrome’s Autocomplete feature uses your history and browsing activity to generate results. In other words, it is picking up the data from the cache. But if a website has changed its IP or DNS, that wouldn’t be reflected in the cache.
As a result, the browser would continue to use the old stored file, which could lead to the issue. So you could disable autocomplete feature and then check if the issue gets fixed.
- Launch the Chrome app on the computer.
- Click on the Menu, and select the Settings menu.
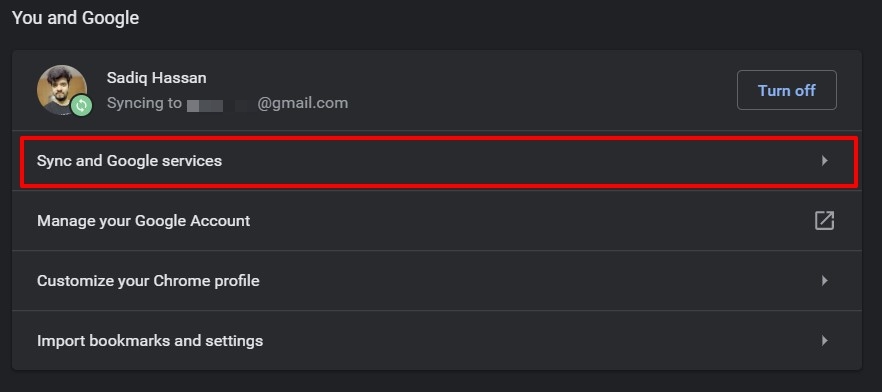
- Select and open the Sync and Google Services sections.

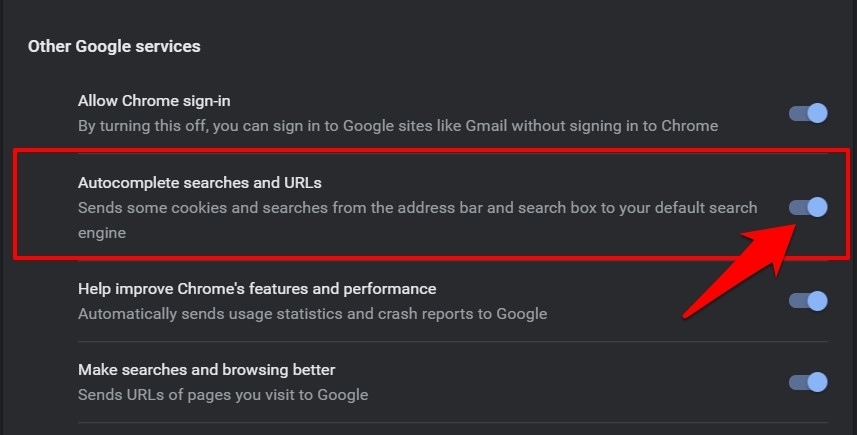
- Scroll to the Other Google Services section and disable the Autocomplete Searches and URL toggle.

- Now try accessing the site, and the host might have been fixed.
Auto complete is undoubtedly a handy feature, but if it leads to a host issue, you should keep it disabled.
Bottom Line
Perhaps, there are chances that the website owner migrated to a new host and has recently made the DNS changes. Hence, taking time to resolve the new IP addresses, therefore revisiting the site after a few hours should also work in such cases.
In my case, switching from the default DNS to the one from Google Public DNS worked. If you’re concerned with Google, you can use CloudFlare DNS addresses 1.1.1.1.
Lastly, if you've any thoughts or feedback, then feel free to drop in below comment box. You can also report the outdated information.