
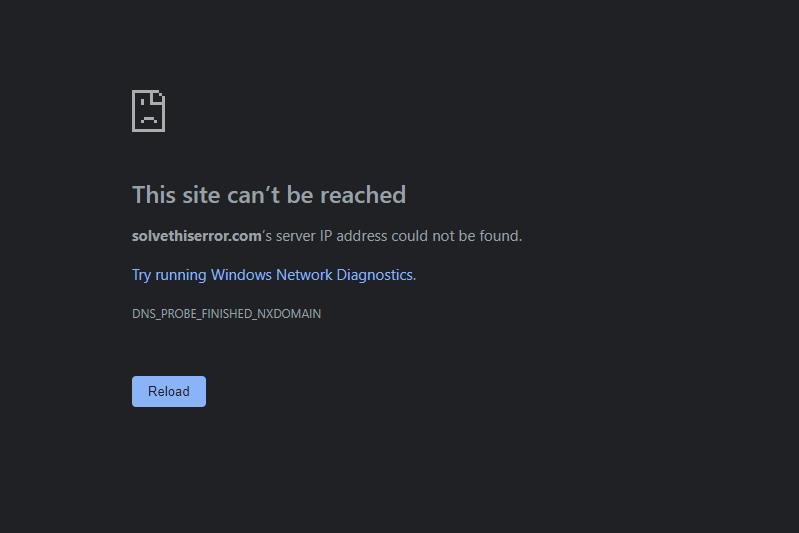
Chrome browsers often encounter errors; however, they might also display the site not being reached or the IP address not being found error.
To resolve the issue, you can check your internet connection, fix network issues, check proxy settings, change IP and DNS settings, and reset IPv4 settings to default to correct the underlying problem.
In this guide, I have shared written instruction about:
Method 1: Check for Internet Connection Stability
The first of your network is out. You cannot access any website. Hence you’ve to make sure that you have a working internet connection.
Also, you can use the ping command from cmd (in Windows) or terminal (in Mac or Linux), by
- Open cmd from the Start menu or using the Run command cmd OR, press + and on the dialogue box, type cmd and hit .
- When the command prompt opens, type ping google.com and check for results.
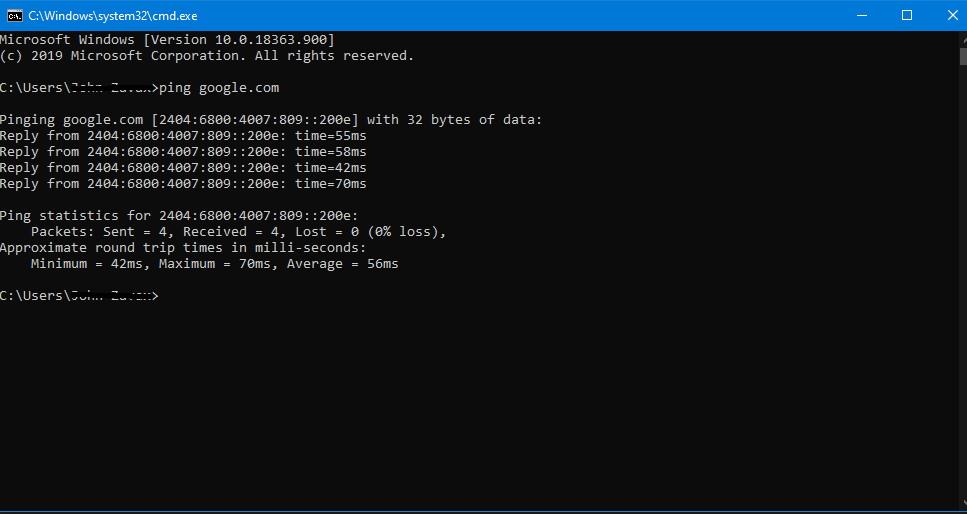
If the result shows statistics instead of an error, you have a working connection, and you can proceed with step #3, or you’ve to go through step #2 to fix network issues.
We also have different browser basic troubleshooting methods that can help you detect issue early before proceeding to advance troubleshoot.
Method 2: Windows Network Diagnostics
Network issues may occur due to poor configuration of network settings and Network drivers. And such network issues can give rise to Site can’t be reached, the Server IP address could not be found errors.
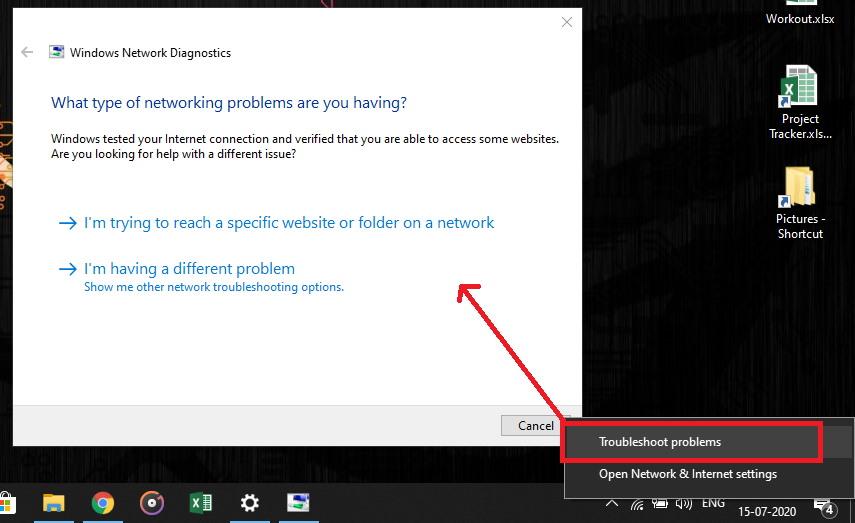
First, run the troubleshooter available with Windows to run diagnostics and fix.
- Right-click on the ethernet or wifi symbol from the taskbar and click on Troubleshoot problems.
- Wait for the troubleshooter to check errors in the background and fix them for you.

The troubleshooter will automatically apply the best network settings and make the changes. It might ask to make some adjustments if things are out of its control (something that needs administrative access).
Method 3: Update Windows Network Drivers
There could be network drivers that don’t support the network hardware within the computer. The best thing you can do is to update the network drivers.
- Open Device Manager using the Run command devmgmt.msc in the run dialogue box.
- Right-click on the Network adapter and click the Update driver command.
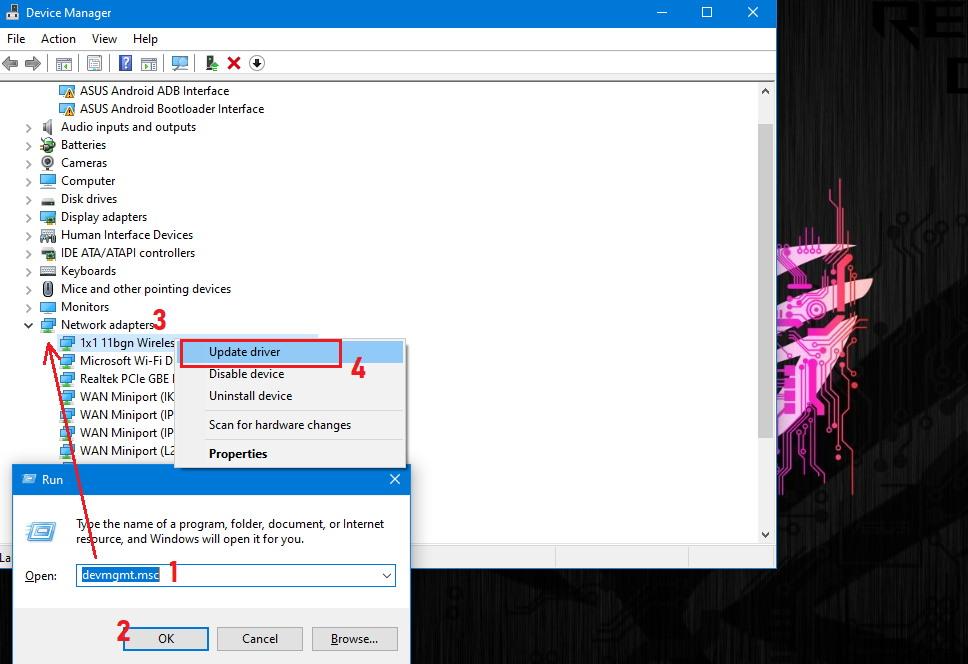

- You can also use drivers provided by the manufacturer from their website—for example, Realtek or Atheros.
It will automatically look up driver and hardware changes and repairs to rectify the network issues.
Method 4: Check and Default Proxy Settings
Proxy settings, when misconfigured, will cause errors. Allowing a proxy to detect automatically will solve the problem.
- Click on Menu

 at the top-right corner.
 - Select the Settings menu.
- On the Settings page, scroll down until you see Advanced, and click to open it.
- Now scroll down until you see Open your computer’s proxy settings.
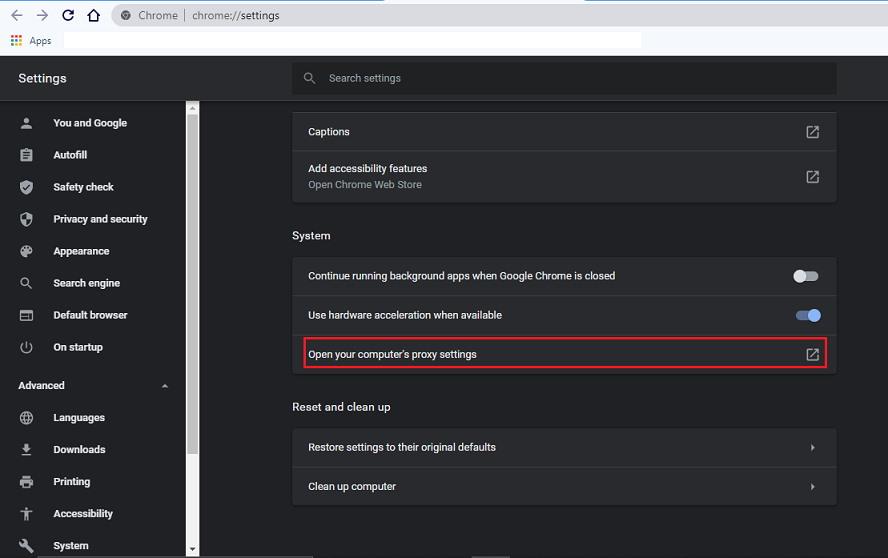

- Click to launch the Proxy settings within the operating system.
- Set the proxy setting to Automatically detect settings.
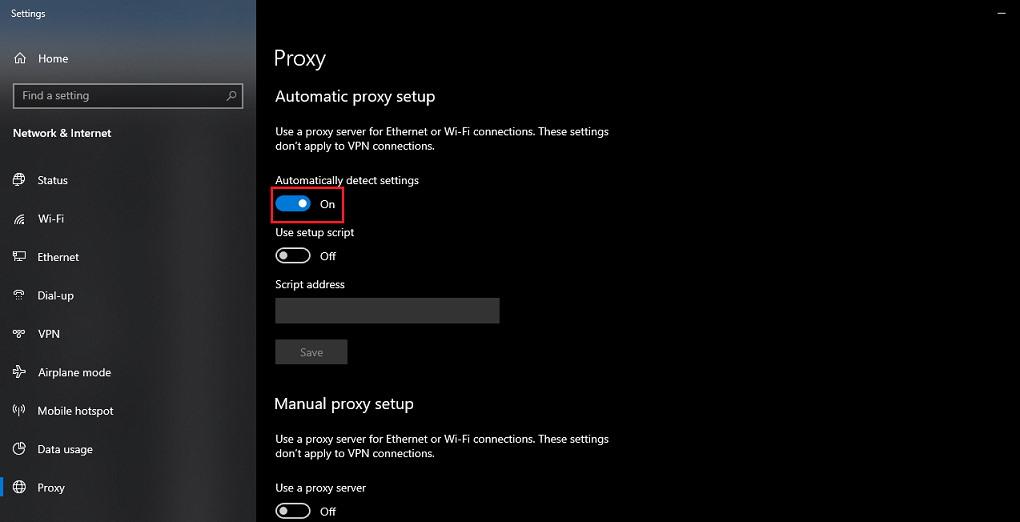
It automatically chooses the best proxy setup and ensures your internet works without issues.
Method 5: Change IP and DNS settings
IP and DNS are vital for connecting to the internet; hence, they must be appropriately configured. IP will be automatically obtained using the DHCP protocol. So, here we can enable DHCP to configure IP automatically.
In most cases, the options are set to default. However, you can revert the changes if you’ve made any changes or if any antivirus software has deliberately misconfigured it.
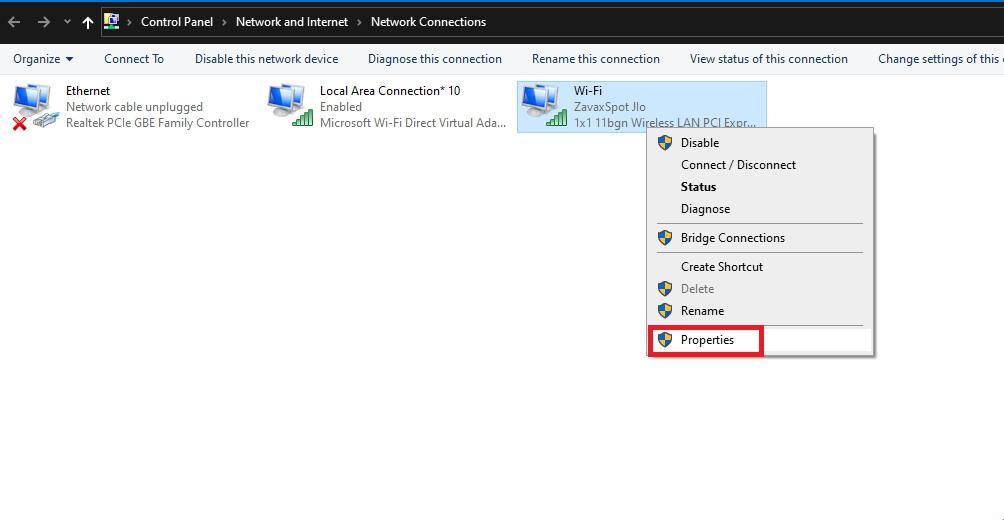
- Right-click on the network icon on the taskbar and click on Network and internet settings. OR
You can also lookup up Network and Internet settings in Windows Search. - From the Status menu, click on Change adapter settings.
- When the control panel is launched, right-click on the network adapter through which you’ve connected to the internet.
- Select the Properties sub-menu.

- From the properties tab, click on Internet protocol version 4 (TCP/IPv4) and click on Properties.
- In the properties tab, select Obtain an IP automatically and Obtain DNS server address automatically.
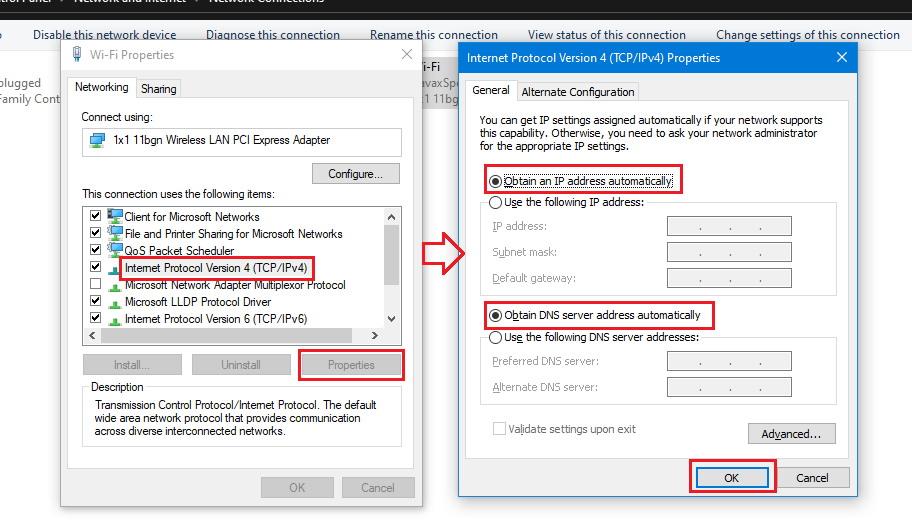

- Hit to save the changes and reconnect to check if the problem persists.
Resetting the IPv4 settings and flushing the DNS resolver cache are the last steps that can fix all the issues within your computer.
If your PC belongs to a private DNS service or uses proxy-based connections, you can contact your network admins to get those configuration settings.
Method 6: Reset IPv4 settings using Command Prompt
If nothing works, you can reset every setting to avoid conflicts. Using cmd, we can issue netsh commands to reset IPv4 settings in Windows PC.
- Launch the CMD prompt as administrator, and type netsh winsock reset and hit .
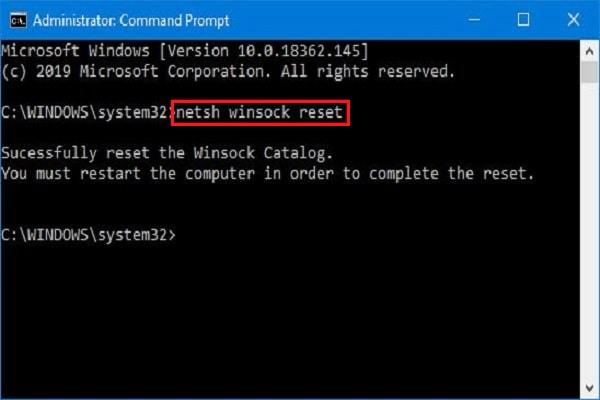

- Now restart your PC.
- Open CMD again and type netsh int ipv4 reset reset.log and keypress .
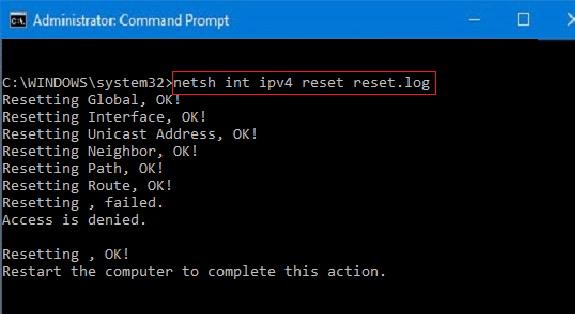

- Again restart your PC and check if you can connect to the internet.
It will completely reset all the IP configurations and changes we made to the default one for automatic resolution.
Method 7: Flush Network DNS Cache
You can also flush the Domain Name Server (DNS) information cached on your system.
- Open cmd as administrator and type ipconfig /flushdns
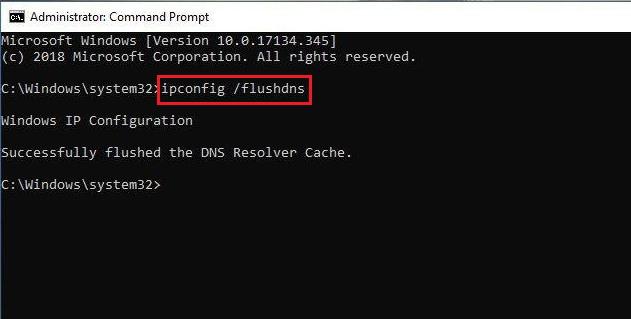

- If everything is running right, you should get this as output — Successfully flushed the DNS Resolver Cache.
Finally, check if this solves your issue and if you are no longer receiving the error.
Bottom Line
The site cannot be reached; the Server IP could not be found is a tragic error many people face daily. Such errors can drastically degrade one’s internet experience. Also, you won’t be able to do online transactions if you keep getting such errors.
And if your problem hasn’t been solved yet, ensure you have paid for your Wi-Fi or cellular connections. Sometimes we don’t realize it, but our internet data is empty. In such cases, you are prone to encounter such error messages.
And once the error is solved, don’t do online transactions for 2-3 hours. Monitor if everything is working fine, and if yes, you can start doing sensitive tasks such as website logins and online transactions without worrying about error codes.
Also, as mentioned, the Server IP address error could be genuine. The website is down, and the DNS resolver cannot map a domain name with an IP address. In such a case, we have no option but to wait until the website admin fixes the mapping between the domain address and the masked IP address.
Lastly, if you've any thoughts or feedback, then feel free to drop in below comment box. You can also report the outdated information.


It works for me directly after resetting IPv4 settings using cmd prompt. So glad to found this article. Thank you very very much…
my internet has been disconnecting at around 5.30 every evening and as I am trying to troubleshoot I find out I cannot access my IP address. I will be calling my internet provider tomorrow but frankly I am quite worried something is compromised!
Tried everything – did not work.
Then I added the ip and domain name in my hosts file and then it worked immediately
Thanks for the tip!
I meant to say “after hours working with Comcast and my IT team and failing!: 🙂
You are a life saver!! This worked after hours with comcast and my IT team. So excited. thank you!!
Hello, please can you assist me. The error message I get is
“This site can’t be reached SITE-URL-REMOVED server IP address could not be found.
Try:
Checking the connection
ERR_NAME_NOT_RESOLVED”
If I use opera to browse, the website will load on my phone. However, if I use chrome, I get the above error message. However, I can open all other websites on the chrome website. Is it possible to add a metatag on the website to make it load on chrome?
I just wanna know if this “SITE_REMOVED” site is working, if yes then please tell me how I can open it because this site isn’t opening in my phone and please reply as soon as possible
The website is not accessible. It’s the problem with the webmaster, not your browser.
I was first having this problem accessing some sites such as Twitter and all domains hosted on my research lab’s server. This problem only occurred in Chrome (I can access everything normally through Edge) and only in Windows (my pc has dual-boot and I can access it normally through Chrome on Linux). So the problem is in Chrome on Windows. I’ve tried to solve it in different ways. Somehow I managed to solve the problem of accessing common sites such as Twitter. But the problem persists in accessing websites hosted on my lab’s server. When I tried the last option (Reset IPv4 settings and flush DNS cache), I was able to access it normally for only 1 or 2 minutes. After that, the problem came back again. None of my many lab colleagues have faced a similar problem, it’s just me, and my chrome, and my windows. It’s not a big deal, as I can access it in other ways, but this problem really bothers me because I’m a Ph.D. in Computer Science and I still haven’t been able to solve it.
Thank you man…you are a life saver
With my newly built computer I just began having this problem on sites for my state agency. Other browsers for the user have no issue. Other users on the same machine have no issue with Chrome. To resolve I must close Chrome, delete the %userprofile&\appdata\local\google folder, then open Chrome again. I must log in to my Google account again and set whatever custom settings again. I must say no to all the nuisance notification requests when browsing again. But I can fix the problem. Clearing the Chrome cache does not help. I did the above steps anyway, knowing they would not help.
To fix temporarily I added lines to my hosts file for the two problem addresses at my state agency. Since this is not a permanent solution I guess I will comment out the lines each Monday and test.
thank you so much this was my problem and it was the only solution that worked so bad i lost everything but at least it works again.