
Despite being the most user-friendly browser, Chrome sometimes might frustrate users by showing the Aw Snap! message with some status codes.
In such instances, you can check your internet connection, clear browsing, and site data, remove unwanted extensions, stop all Chrome processes, and update the browser app to fix the most common Aw Snap errors.
In this guide, I have shared written instruction about:
Method 1: Check Internet Connection
The first thing we can do against the error in Google Chrome is check and ensure you’re connected to good internet. After establishing a reliable internet connection, you may reload the particular tab showing the error message.
You may have to reload the tab multiple times, but the page will load up if your internet connection gets established.
We have a detailed guide with a few other basic troubleshooting methods that can help you resolve the problem.
Method 2: Clear Site and Browsing Data
If the “Aw Snap!” error persists on your Chrome browser even with good internet, the problem solely lies with the browser. To counter this, we may start by clearing the Chrome browser’s data.
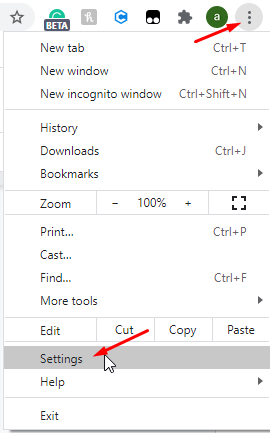
- Click on the Menu

 at the top right corner of your Chrome browser.
 - Open the Settings page.

- Once you’re inside Chrome’s settings, head to the Privacy and security section.
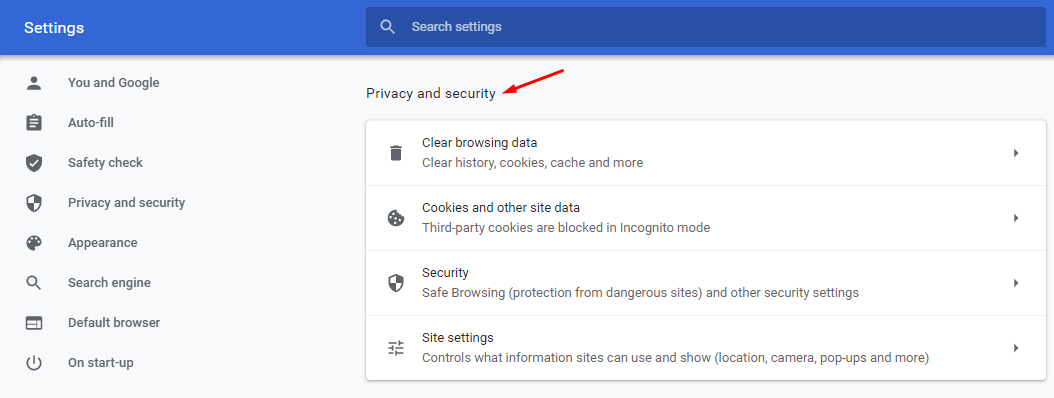

- From there, click on the Clear browsing data option
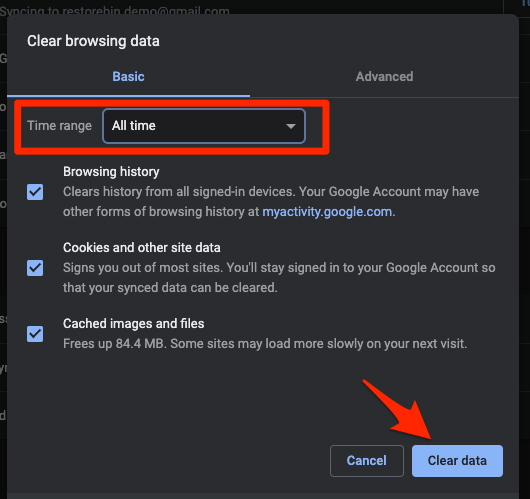

- Next, set the Time frame to All time and check the following options:
- Cookies and other site data
- Cached images and files
- Hit the button and wait for the process to finish.
Doing this will clear out any incorrect site data stored in your Chrome browser. The clearance could resolve the issue by preventing the old site data from interfering with your browsing experience.
Method 3: Stop all Chrome Processes
Google Chrome is known to act weird when its device runs out of memory to perform anything anymore. In such cases, ceasing all other activities on your device might resolve the issue.
- The first thing to do is close all other browser tabs except the one showing the Aw Snap! Error.
- Next, close any other apps that may be running on your device. Only keep the Chrome browser open and running, and close everything else.
- Moving on, the next thing to do is pause/stop/close any downloads on your device.
- Finally, the last thing to ensure is that you have proper extensions on your browser.
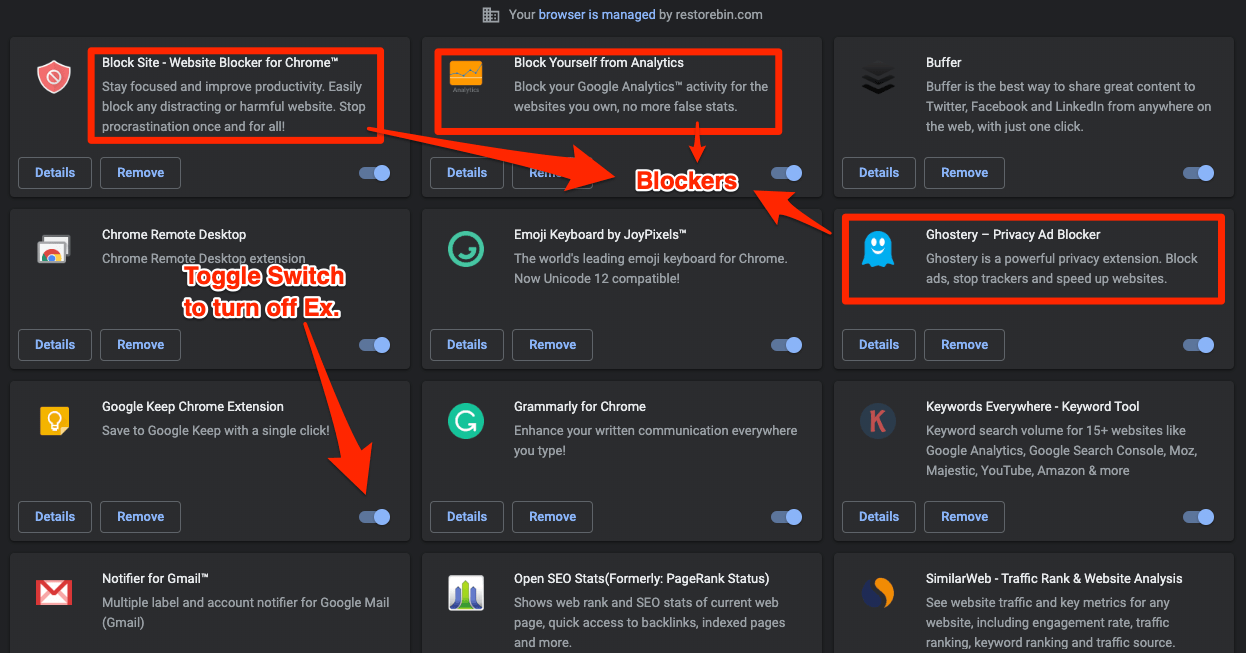
Method 4: Remove Chrome Browser Extensions
If you find any unwanted, suspicious, or scam extensions, remove them immediately.
- Launch the Google Chrome browser.
- Click on the Menu for more options.
- From there, hover your mouse over the More Tools option and head inside Extensions.
It will now give you the list of the installed extensions. - Find the scammy ones and click the button to remove them.

The key is to cease all programs and activities that may consume memory in the background. Once that’s done, try reloading the particular tab and see if that resolves the issue.
Method 5: Update Chrome browser to Latest Version
It always good to have an updated browser to its latest version. The process of updating can be confusing, so here are the steps to be followed:
- Launch the Google Chrome browser.
- Click on More menu and select the Settings from the list.
- Click on About Chrome on the left side of the screen.
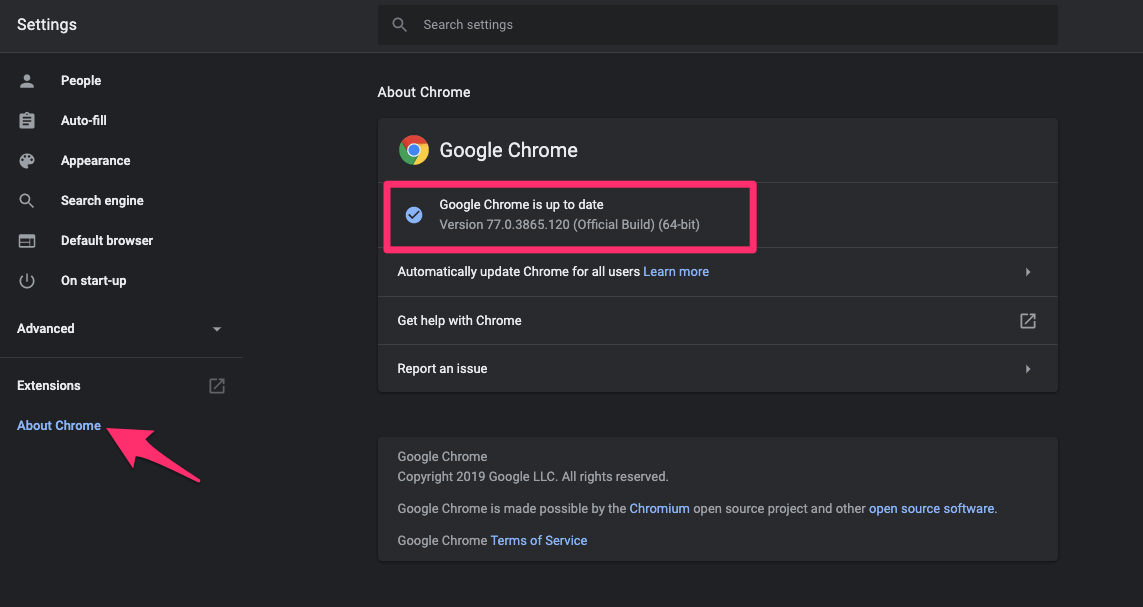

Google Chrome will automatically download and install the browser if there are any pending updates. You’ll either see a Relaunch button or a message indicating your ‘Chrome is up to date’.
If you see the button, there’s an update available, and clicking on the latter button will update the browser for you.
Bottom Line
That effectively marks all the possible fixes available for us to counter the “Aw Snap!” error.
Considering my case, my Chrome browser was up to date, and I had an excellent internet connection. What ultimately proved helpful for me was clearing the browser data, which worked like magic.
Since this error we’re seeing is vague, we must do everything within our capability to counter it.
Lastly, if you've any thoughts or feedback, then feel free to drop in below comment box. You can also report the outdated information.


have tried every single solution and still having the problem, is there any other way to fix it?
Hi Sarah, The methods mentioned in the post are the most common troubleshooting methods that have generally worked for Chrome browsers. If you want more ways, then you can:
1. Change the Proxy and DNS settings
2. Lastly, Reset the Chrome browser (before this, check if the page you’re trying to access is working in alternative/other browsers).
Let me know how it goes. If you still need help, you may visit a local service center for advanced troubleshooting.