
Chrome browser auto-reloads/refreshes web pages when we are inactive in a particular tab to regain memory.
To fix the issue, turn off the purging of open or loaded tabs, clear the browser cache, run an SFC scan on your system, etc., to stop the auto-refresh.
In this guide, I have shared written instruction about:
Why Chrome Auto-Reload?
By default, Chrome is programmed to automatically erase the data of any open, loaded tabs if the browser uses a lot of memory. This automated process conserves system resources and reduces the pressure on your browser.
From one perspective, this is the ideal way the browser should operate, as this process will ultimately reduce the chances of your system(or the browser alone) slowing down or crashing. It may be better when thinking about how difficult it is to cope with a slowed-down and crashing system rather than wait a few extra seconds for the tabs to reload.
It happens either because the browser is erasing the data or because there’s a possibility that some corrupt files/data are interfering with it. However, applying the steps below will prevent the Chrome browser from erasing the open/loaded tabs.
Method 1: Turn Off Memory Saver Feature
The Chrome browser has a Memory Saver feature that typically hibernates the inactive tabs and uses the memory resources for active tabs or even other system applications. When you revisit the inactive tab, it reloads it to make a connection.
Hence, disabling the memory saver will stop the tabs from auto-reload. You can configure it from the Performance settings by following these steps:
- Launch the Chrome browser.
- Click on the More

 menu and select the Settings menu.
 - Switch to the Performance tab from the left pane.
- Disable the toggle button to turn off the Memory Saver feature.
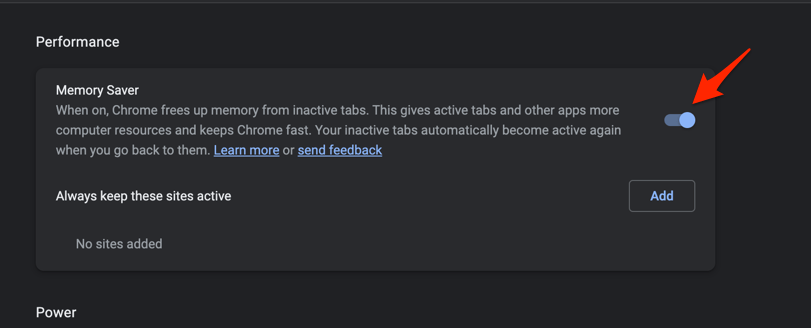

It will stop the memory saver feature and won’t stop the inactive browser tabs from background activity.
Note: Instead of disabling the Memory Saver on the Chrome browser, you should consider adding the site URL to the exception list. It helps in avoiding the tab from going inactive mode.
Method 2: Toggle off Auto Discardable
It is a new addition to Chrome, which I believe was introduced during the automatic tab discarding the Chrome flag. It turns off the auto discarding that reloads the website page that has been inactive for a time.
To turn off the Auto Discardable toggle, we must visit the chrome://discards address. It will show the list of active tabs and the option to stop auto-reload. It also displays the Site Engagement Score and Reactivation Score that help Chrome understand the inactive site for auto-reload.
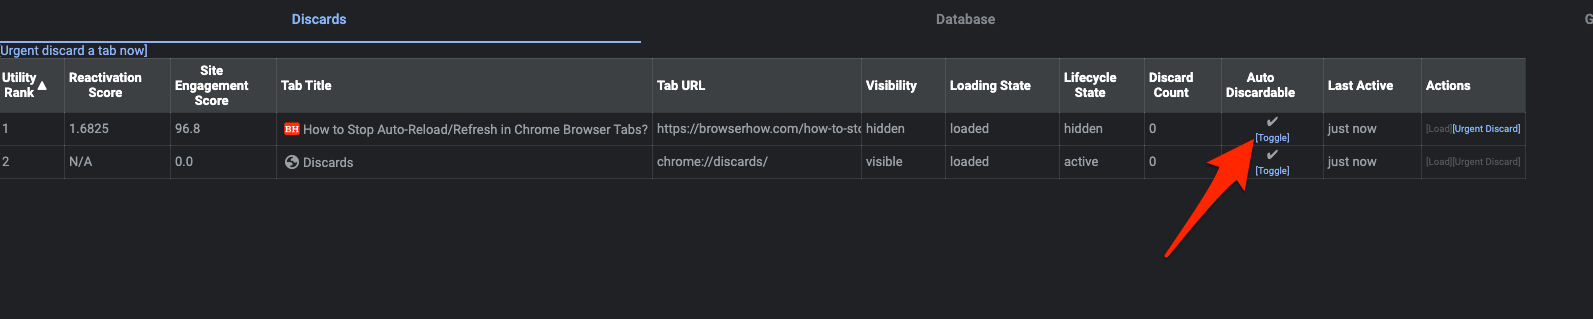
If you want to disable or stop the auto-refresh, you can click on Toggle to turn off the Auto Discardable checkbox against the open tab, and you’re done.
The only major caveat is that the setting is not permanent. If you close the Chrome browser and relaunch, Auto Discardable is re-enabled for the site. However, you can use this setting to keep Chrome active and running.
Method 3: Run an SFC scan on System
The purpose of an SFC scan is to scan all protected files on your system and fix any files/data that may be corrupted. There is slight chance that system files are corrupted that causing the auto-reload.
Here are the steps to run an SFC scan on Windows PC:
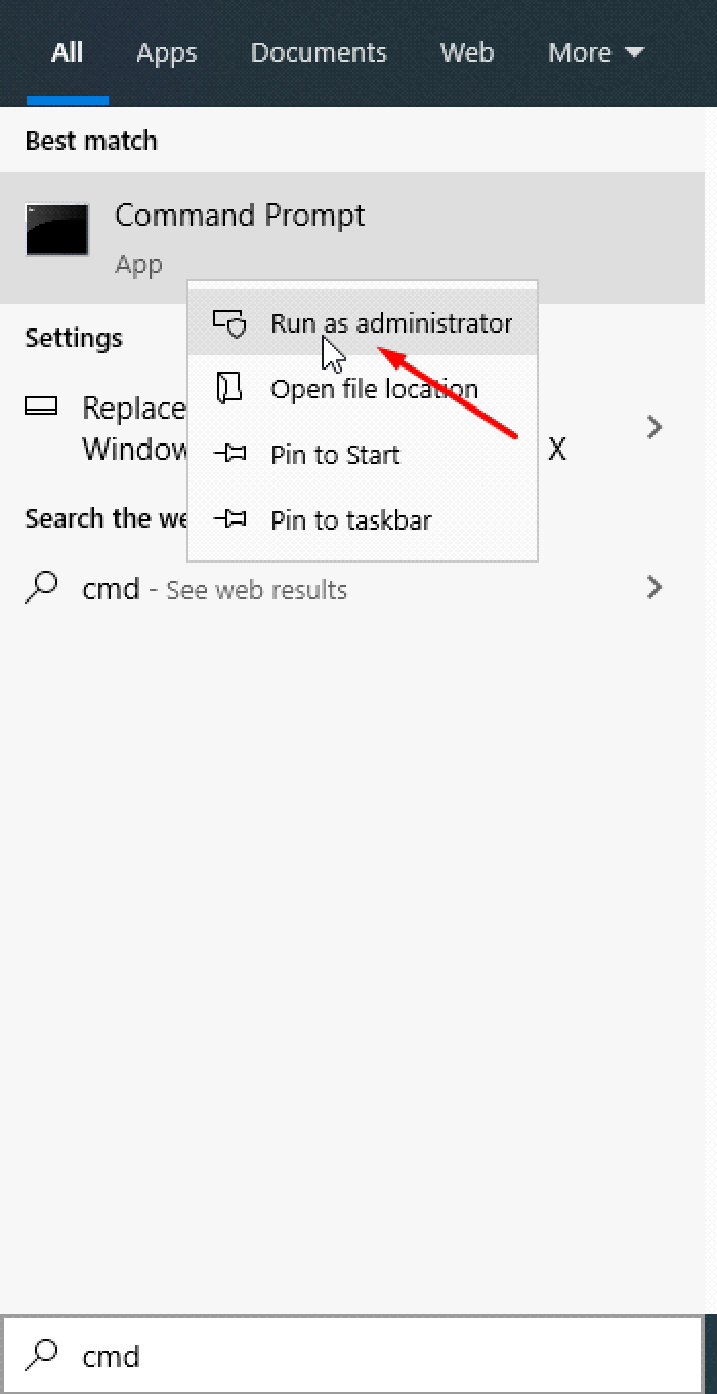
- Start by pressing the + key shortcut to bring up Windows search.
- Type in cmd into the search bar.
- From the results, right-click on the Command Prompt program and choose to Run as Administrator.

- Then, copy and paste the following command into the Command Prompt window: sfc /scannow.
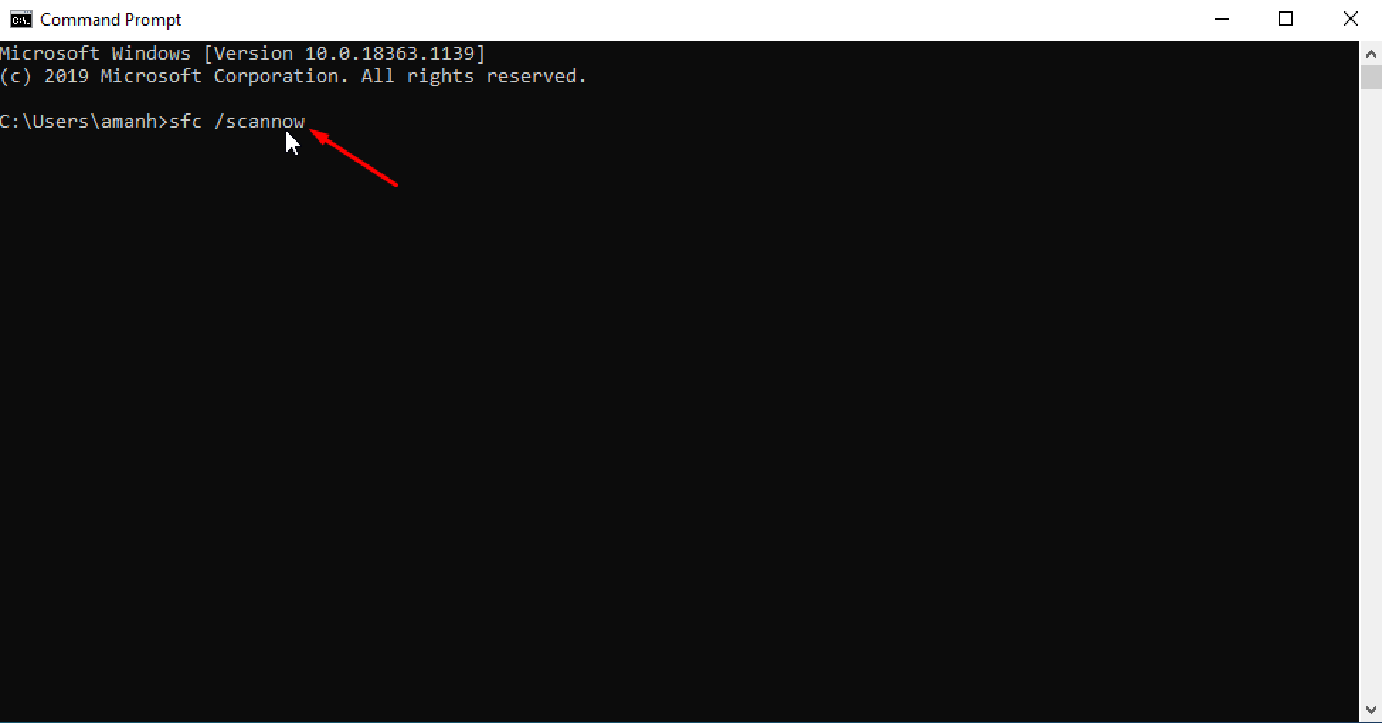

- Finally, press the key to initiate the SFC scan.
In the worst case, it will finish successfully in a few seconds or minutes.
When the scanning process is successful, it will replace the corrupted data with its respective fixes. If the scan finds no corrupted data, it will return a message. Either way, close the window when the process is complete, and you’re set!
Method 4: Restart your Computer System
If the two fixes given above don’t work out, then the final step we can take is to restart the system.
Restarting the system solves many problems, whether on a Chromebook, Mac, or Windows. However, remember that this is a temporary fix for some users. In my case, restarting my computer did help me with the issue on some level, although it did come back after a few hours.
Although restarting your system might only be a temporary fix, it is worth trying to see how much it will impact the issue.
Bottom Line
Concluding, users that saw no success with any of these solutions should perhaps wait until Chrome acknowledges the issue and release an update that will fix the same. However, disabling the automatic tab discarding flag in Chrome for most users will fix the issue.
The SFC scan returned no corruption at all. My final application was disabling the last flags in Chrome, which certainly did resolve the issue for me.
You can also follow these articles to manually hard refresh the site on the Chrome browser.
Lastly, if you've any thoughts or feedback, then feel free to drop in below comment box. You can also report the outdated information.


Disabling the memory saver worked for me.
Settings / Performance / Memory Saver – toggle to off
Wayyyyyyyyyy to complicated. Way to many options. Way too many people saying it doesn’t work.
I’m blow away at how awful and buggy the world’s most used software is.
I’m having this issue only with my Note 20 ultra – & unfortunately I use it the most. Don’t have this problem with Windows 10 on my HP laptop or on my iPad, only on my phone. I tried the chrome://discards option but didn’t have any luck.
Got the blank page saying:
This site can’t be reached
The webpage at chrome://discards/ might be temporarily down or it may have moved permanently to a new web address.
ERR_INVALID_URL
I’m a Research Assistant so this is a huge problem for me.
This extension helps to do exactly what we all want here to solve: Disable automatic tab discarding
I works just as described, and you can prove it on your:
chrome://discards/
There is nothing to set up. Just install it and that’s it.
However, some other extensions may interfere with it, if the code from different extensions work on the same chrome processes.
Keep in mind page reloads are not only and not always due to chrome bugs or particular ways chrome try to avoid “freezing” or “crashing” itself, but scrips within each website source code too.
In other words, some page reloads are not related to chrome itself, but for the ones related to this chrome “Auto Discards” functionality, this extension works exactly as we need.
depuis mi-avril 2022 la version 100 de chrome, on ne trouve plus le flag ni l’ accès à chrome://discards/ . Même l’ extension “Disable automatic tab discarding” qui était parfaite pour empêcher l’ actualisation automatique aurait besoin d une mise à jour car la version 100 l’ a anéantie .
dernière minute : désactiver disable le flag : Tab Hover Card Images
It would be ever so nice if the boffins at Google Chrome undertook to learn the distinction between “update” and “sabotage”.
At what stage of the process were any end users consulted?
Guys, I think I know what’s the solution is if you on chrome delete your account and re-enter again and see it worked for me but I don’t know that this bug or I don’t know gonna be back.
Neither methods are working anymore, If I go to discards and disable the websites it will still keep reloading the page
nice tip thanks
I can’t read this cos it’s refreshing literally every second!!
I highly doubt that. It refreshes tabs that you go to after not being on them, not ones that are currently active. So you are likely having some other issue. “literally”.